.png)
Getting Started - Banking Administrative Panel
The following guide is leading you through the Banking Administrative Panel essentials. Learn the process of account opening, user registration, and identification.
Resources to help you get started:
Getting started – Administrative Panel Overview
Crassula Support - help@crassula.io
Overview
Once you have signed in with the Administrative Panel, navigate to the following Banking menu items to overview the essentials:
Persons tab provides the following (see Persons for detailed information):
Registered users list
User personal details
Manual user registration (refer to the User registration paragraph)
User accounts and documents
Companies tab provides the following (see Companies for detailed information):
Registered companies list
Company details
Manual company registration (refer to the User registration paragraph)
Company accounts and documents
Accounts tab provides the following (see Accounts for detailed information):
Opened accounts list
Account and user details
Manual account opening (refer to the Account opening paragraph)
Account service provider
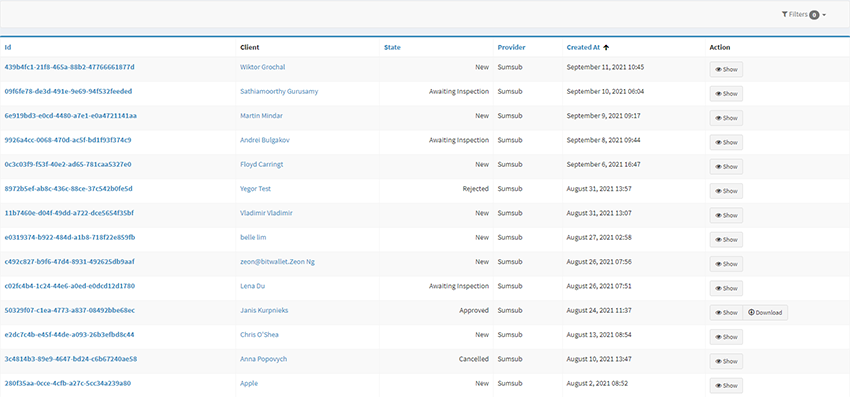
Identification requests tab provides the following (see Identification requests for detailed information):
The list of identification requests
Manual verification (refer to the Identification paragraph for details)
Client documents provided
Identification
User identification is an indispensable part of any financial platform that is obliged to satisfy all legal requirements. Crassula Banking provides two different ways of user identification:
External provider identification - The user completes the online sign-up form, then the data is transferred to the external verification provider - Sumsub. The process does not require any assistance and is executed as follows:
Sign up form is completed
A primary account is opened
A verification link is sent to the user’s email
The email verification is executed via the link provided
The user is navigated to a phone verification link
Once the verification code is entered, the user completes the verification of the contact information
The user is navigated to the document verification page using one of the following methods:
A link for documentation upload
A QR-code for online video verification
The user completes the questionnaire (optional)
Documents approval (takes up to several minutes)
The primary account is activated
Provider is an external service delivering additional functionality via APIs. As an example, the identification service is held by Sumsub. Sumsub executes document verification and provides access to the advanced identification dashboard. Therefore Crassula delivers various banking solutions that do not require manual assistance.
Manual identification - the user completes the online sign-up form, then the data is verified manually by a KYC Administrator in the Administrative Panel.
Most of the identification requests are executed automatically by the Sumsub provider. The following paragraph describes the identification way that is exceptional and requires manual assistance.
Manual identification
Once a private person has completed the sign-up form, an administrator starts the identification according to the following steps:
Navigate to the Banking tab of the Administrative panel.
Click the Identification request menu item.
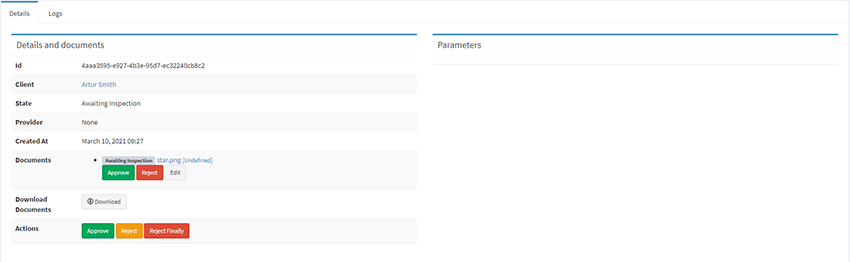
Click Show or an Identification request number in the first column.
Click Download to see the documents attached.
Use either Approve or Reject buttons in the Documents field to change the status of the documents. Documents rejection does not decline the identification request – the user is informed to upload correct documents.
Use either Approve or Reject buttons in the Actions field to change the identification request status. Clicking the Reject Finally permanently adds the user to the blacklist.
Once the user receives the identification approval, the account is activated and fully functioning.
User registration
In most cases, a private person completes the sign-up process unaided by filling in the online form. The company registration process is held after an online request via the sign-up form after the Person registration is complete. Manual user registration is available as an alternative to online sign-up and requires an Administrator with correspondent access roles to the Administrative Panel. Once the registration is complete, a Primary account is automatically opened. The Primary account activation is executed only after the identification is complete.
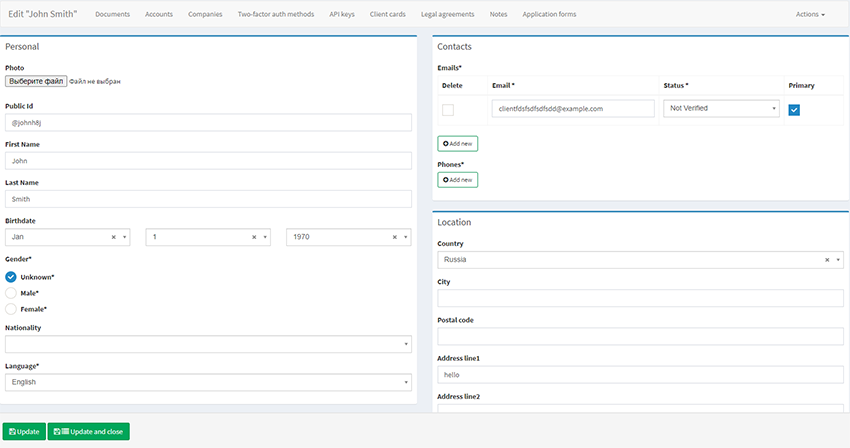
Manual registration of a private person
Navigate to the Admin Panel.
Go to the Banking tab in the left sidebar.
Click the Persons menu item.
Click Add New in the top-right corner.
Complete the forms to create the profile. See Limits to learn more about Verification Levels and Limits.
Click Create to confirm the user registration.
The email and password mentioned in the form are to be used by the user for sign-in. After the first log-in, it is required to activate the two-factor authentication.
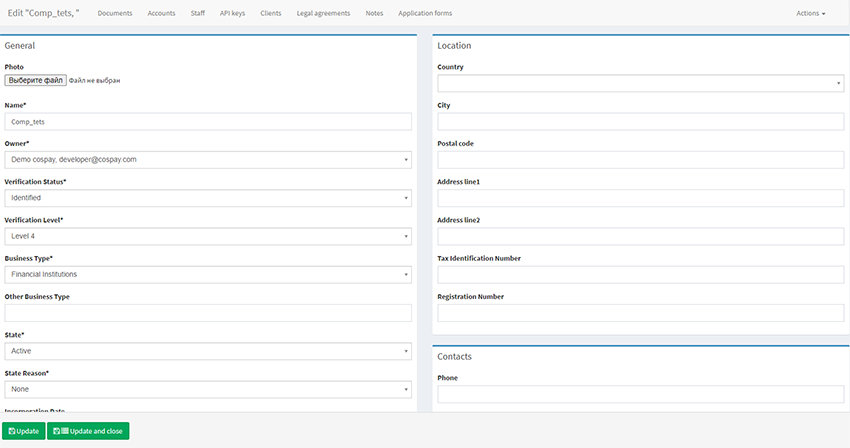
Manual registration of a company
Navigate to the Admin Panel.
Go to the Banking tab in the left sidebar.
Click the Companies menu item.
Click Add New in the top-right corner.
A company requires an owner registered as a private person; if the owner is not registered yet, navigate to 1.2. of the guide.
Complete the forms to create the profile. See Limits to learn more about Verification Levels and Limits.
Click Create to confirm the company registration.
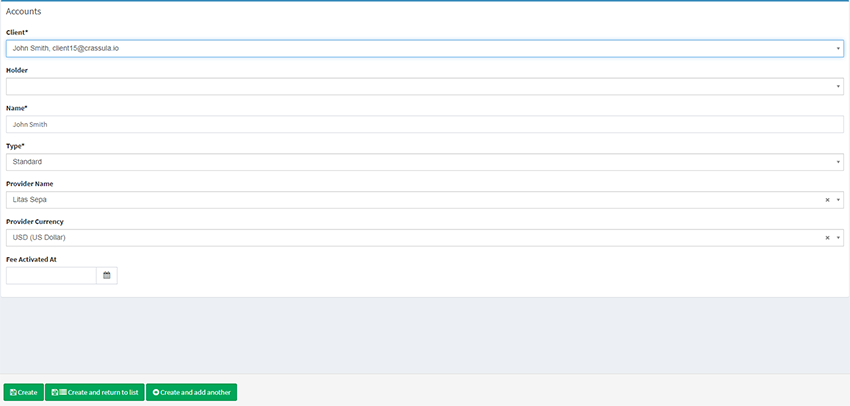
Account opening
Due to the providers connected to the core banking system all users can open accounts independently using the Banking web interface. Though it is possible to open an account manually in the Administrative panel if necessary:
Click the Banking tab in the left sidebar
Click the Accounts menu item. The page stores the list of all accounts opened previously.
Click Add New in the top-right corner.
Type in the Client’s name or email to find the Client you want to open an account for.
An existing user is required. If the user is not registered yet, navigate to the User registration section.
Holder information is optional.
Type the account name in the Name field - the name is to be displayed in the Client’s dashboard.
Choose the type of account from the Type drop-down list.
Provider Name information depends on the external provider configuration.
Provider Currency information depends on the external provider configuration.
Fee activation date is optional.
Click Create to confirm the account opening.
Once the account is opened, all the transfers and transactions can be monitored in the Administrative Panel. See Saved top-up cards and Transactions for details.
What is next?
Navigate to the Banking documentation to learn more about Banking Administrative Panel advanced features.