FX markup fees
Opening the item
Follow the steps below to access cashback details:
Navigate to the Admin Panel.
Click Banking on the left sidebar.
Go to the Price lists menu item.
Select an existing price list.
Click Show or Edit in a price list line to open its details.
Click FX markup fees in the top sidebar to access active cashback rules of the selected price list.
How to create an FX markup fee rule
To create an FX Markup fee
Navigate to the Price lists tab in the Banking sidebar.
The list of price lists will be opened.
Select a price list for configuration and click Edit.
The price list details window will be opened.
Navigate to FX Markup fees in the top sidebar.
Click Add New in the top-right corner.
The Price list field value will be automatically filled with the current price list name. If necessary, change the price list for the rule:
Click List next to the price List field.
Select a price list from the arisen menu.
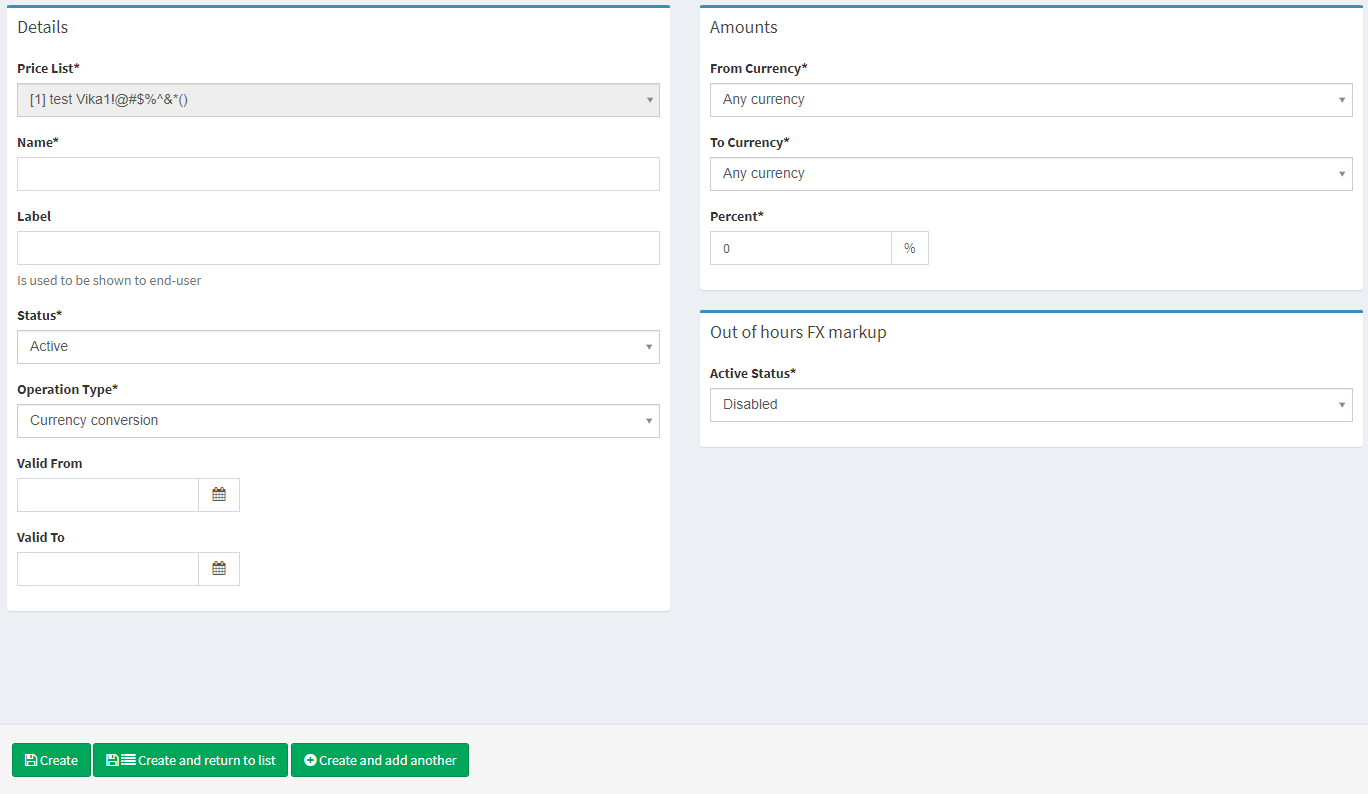
Fill in the Details form. Fields with an asterisk (*) are mandatory.
Set a name for the new rule.
Optionally, set the Label field to define the name of the fee in Web and Mobile Interfaces.
Set the rule status in the Status field to define whether the fee should be Active or Disabled once it is created. It is possible to change the setting later.
The Operation type parameter provides only the Currency Conversion option.
Set the Valid from and Valid to parameters to define the rule validity period.
Fill in the Amounts form. Fields with an asterisk (*) are mandatory.
Set the From currency field to define the conversion source currency.
Set the To currency field to define the conversion target currency.
Set the Percent parameter to define how much to charge from clients as a percentage of transaction amounts. The extra percent will be included in the currency conversion rate.
Click Create to save the rule parameters. The rule will be added to the price list.

Creating a markup fee
See Price lists for parameters and description.
.png)