Sumsub: Verification process of profiles
All service provider details are subject to change. Navigate to the Reference section for the most recent updates.
Workflow

The basic verification flow for persons and companies is performed as follows:
Client Registration: Clients register on Crassula's platform by filling out a sign-up form. Key client data is shared with Sumsub for further data exchange. See the Client data processing section for details.
Document Screening: After registration, clients are required to provide the necessary documents. Sumsub performs automatic checks on these documents.
Screening Results: Sumsub sends the verification results, including the verification level, verification status, and client-submitted data, to the Crassula encrypted server.
Profile Activation/Blocking: Crassula updates the verification details in its system, downloads documents from Sumsub, and activates or blocks the client's profile based on the received results. By default, the client’s account is activated and fully functioning.
When opening a company profile, the company owner goes through the verification process twice: first, when creating a personal profile, then, when creating a company profile. In both cases, verification goes through the aforementioned steps.
Advanced details
Sumsub verification is configured and processed as follows:
A White Label creates custom verification levels to define what kind of personal information and documents must be provided by clients. Various levels allow to define extended limits for those clients who have provided additional verification details.
Once the levels are created, the White label shares their names with Crassula. A Sumsub API key is required for connection.
Crassula adds the names to system config files for the following purposes:
Updating default UI level names with the custom ones provided by the White label.
Matching verification statuses provided by Sumsub with clients of the exact White label.
A verification request is created when a client fills in the sign-up form.
Sumsub receives the client’s personal details and creates an application for the first verification level. Once Sumsub completes the verification the verification status is updated.

Sumsub provides the following details to the Crassula encrypted server :
Verification level
Verification status
Data submitted by clients.
Client documents
The verification details are updated in the Crassula system according to the screening results. Verification data is available in the Identification requests section of the Admin Panel.
Client data processing
Crassula exchanges client data with Sumsub via API and stores it on the secure server. See the following data exchange cases for details.
Client data sent to Sumsub to initiate verification
Persons
First name
Middle name
Last name
Phone number
User email
Country of residence
User ID
Companies
Company info
Company name
Registration number
Tax ID
Country of registration
Legal address
Date of incorporation
Client data received from Sumsub after verification is complete
The response details depend on the verification level requested by the end user.
Referer to https://developers.sumsub.com/api-reference/#creating-an-applicant for the full list of application fields that can be received. The data received is not stored on the Crassula server, except for the parameters mentioned in the Client data sent to Sumsub to initiate verification section.
Sumsub can be configured to request additional details from the client depending on the verification level. Once the new data is verified by Sumsub, it is shared with Crassula and saved as corresponding fields in the client’s profile.
Make sure to always request a full address from the client. If the full address is not shared with Crassula, the corresponding field in the client’s profile will remain empty leading to possible issues with other service providers.
The following fields must be provided at Client Registration or requested according to a verification level during Document Screening:
countrycityaddressLine1(street)postalCode
API methods used for data exchange
Navigate to the following Sumsub Developer Hub pages for API details.
https://developers.sumsub.com/api-reference/#creating-an-applicant
https://developers.sumsub.com/api-reference/#getting-applicant-data
https://developers.sumsub.com/api-reference/#changing-provided-info-fixedinfo
https://developers.sumsub.com/api-reference/#getting-applicant-status-sdk
https://developers.sumsub.com/api-reference/#getting-applicant-status-sdk
https://developers.sumsub.com/api-reference/#getting-document-images
Secondary verification
Secondary verification is performed by Sumsub as the Ongoing ID Document Monitoring service for additional charge.
In case of document expiry, the end user has to go through a secondary verification. The process is executed as follows:
Client data is two weeks away from expiry.
Crassula system notifies the White label of secondary verification to be done.
The White Label follows its internal Risk Based Approach to perform the secondary verification.
If SumSub takes part in the process, the new client data is collected as defined in the sections above.
Crassula server security
All client data received from Sumsub is stored on the Crassula server according to the Payment Card Industry Data Security Standard (PCI DSS) and includes the following security approaches:
Data in transit is received using TLS 1.2 encryption and is only decrypted as it is being imported into the data processing system.
Data at rest is stored within a SQL database encrypted under a the 256-bit Advanced Encryption Standard (AES-256) at the storage device level.
All data backups are stored in the multi-region (backups replication in Google Cloud region) that is geographically closest to the location of the Database instance.
Internal and external scans are performed annually on our network or after any significant change. Additional checks are performed once a quarter of the year.
Crassula implements security measures for accessing data online:
Multi-factor Authentication (MFA).
Hardened workstation equipped (such as firewall, antivirus, and drive encryption).
Every employee is appointed with the minimum necessary privileges.
Server system components have a logging system that tracks each access attempt and a warning system that notifies about any attempt to log in to the server.
Configuring Sumsub
Configuring verification levels
Sumsub provides a dashboard to configure custom verification levels and process applications received from clients. The functionality allows Sumsub to verify clients on various custom levels defined by a White Label.
To configure a verification level
Sign in to the Sumsub dashboard—https://cockpit.sumsub.com/.
Navigate to Integrations > Applicant Levels > Individuals.
Click Create Level.
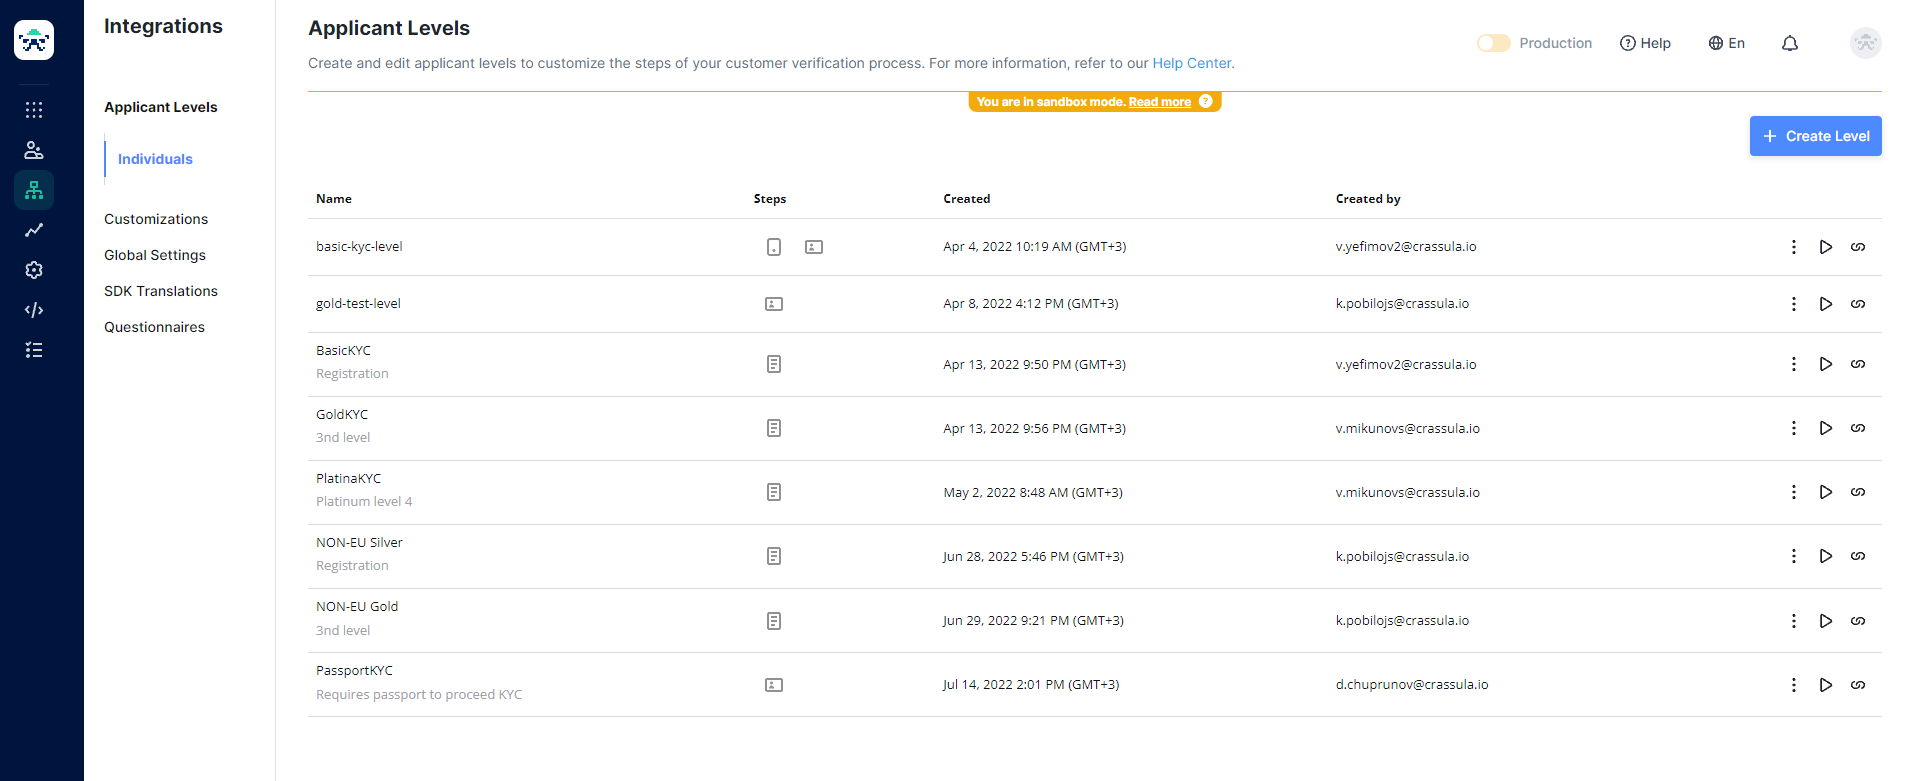
Fill in the General details and define the Required steps for the level.
Select the SDK pack for Web and Mobile customization. At least one level of the BasicKYC type is required for Sumsub to process sign-up applications from clients.
Save the changes.
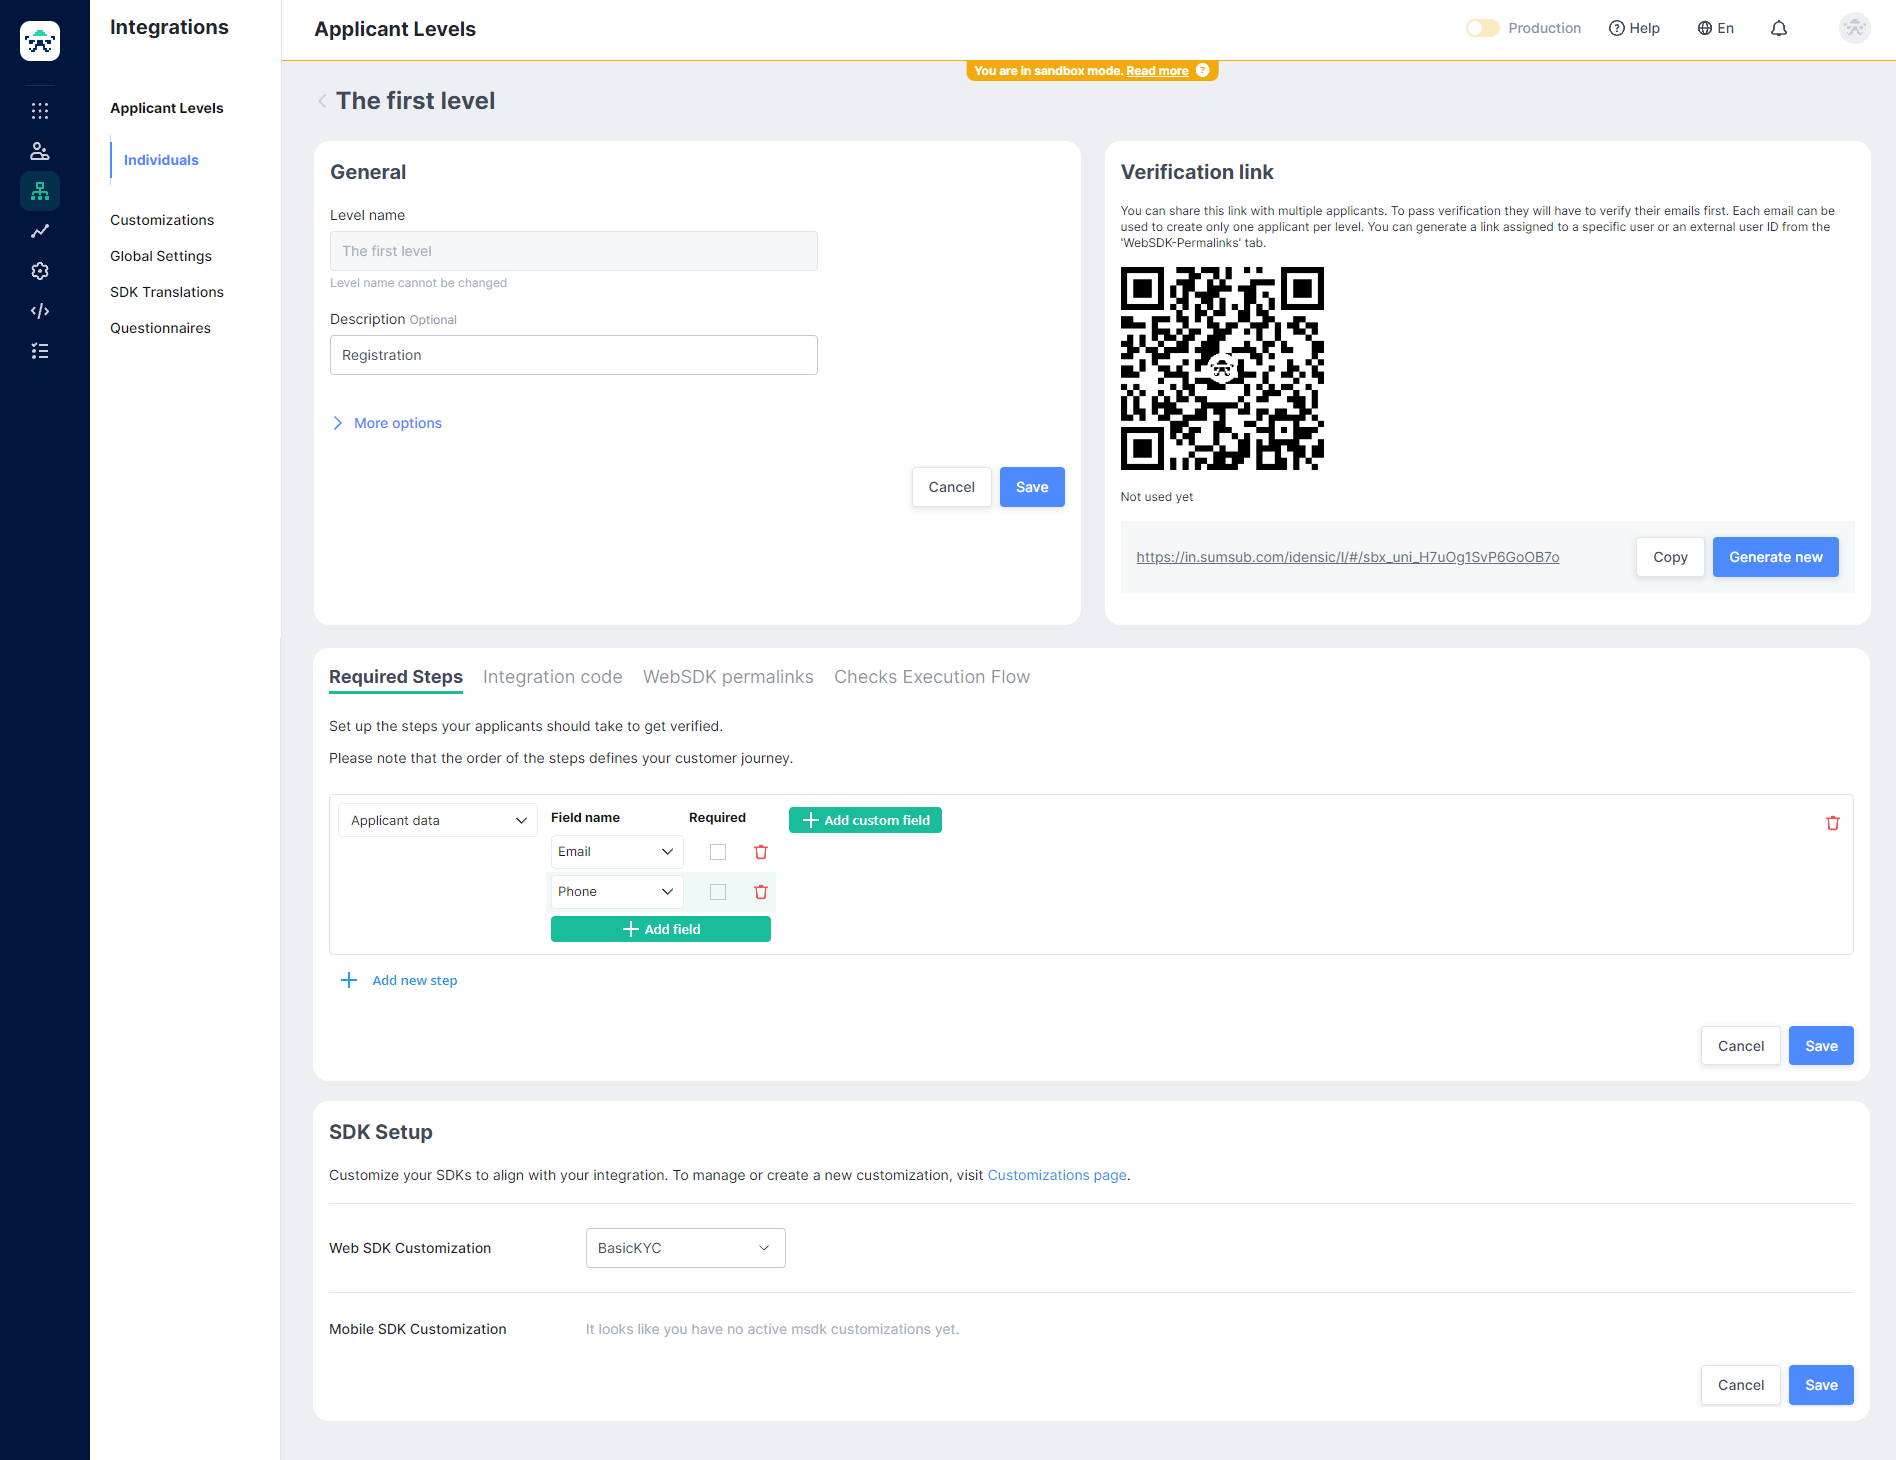
Create additional levels if needed.
Provide the level names to Crassula managers.
The level names will be added to Crassula config files.
White Label's Admin Panel and Web Interface will be updated to contain the custom names provided. For example, Level 3 will be changed to the name set for a level of the GoldKYCCustomization SDK type.
Configuring Crassula Admin Panel
It is recommended that each verification level is provided with upgrade/downgrade fees and limit configuration.
To create upgrade/downgrade fees
Navigate to the Price lists tab in the Banking sidebar.
Select a Price list for configuration and click Edit.
Navigate to Change verification level fees in the top sidebar.
Click Add New in the top-right corner.
Fill in the fee rule details.
Refer to Price lists for additional details on the parameters.
It is strongly recommended to configure fee rules for every verification level to perform manual testing in future.
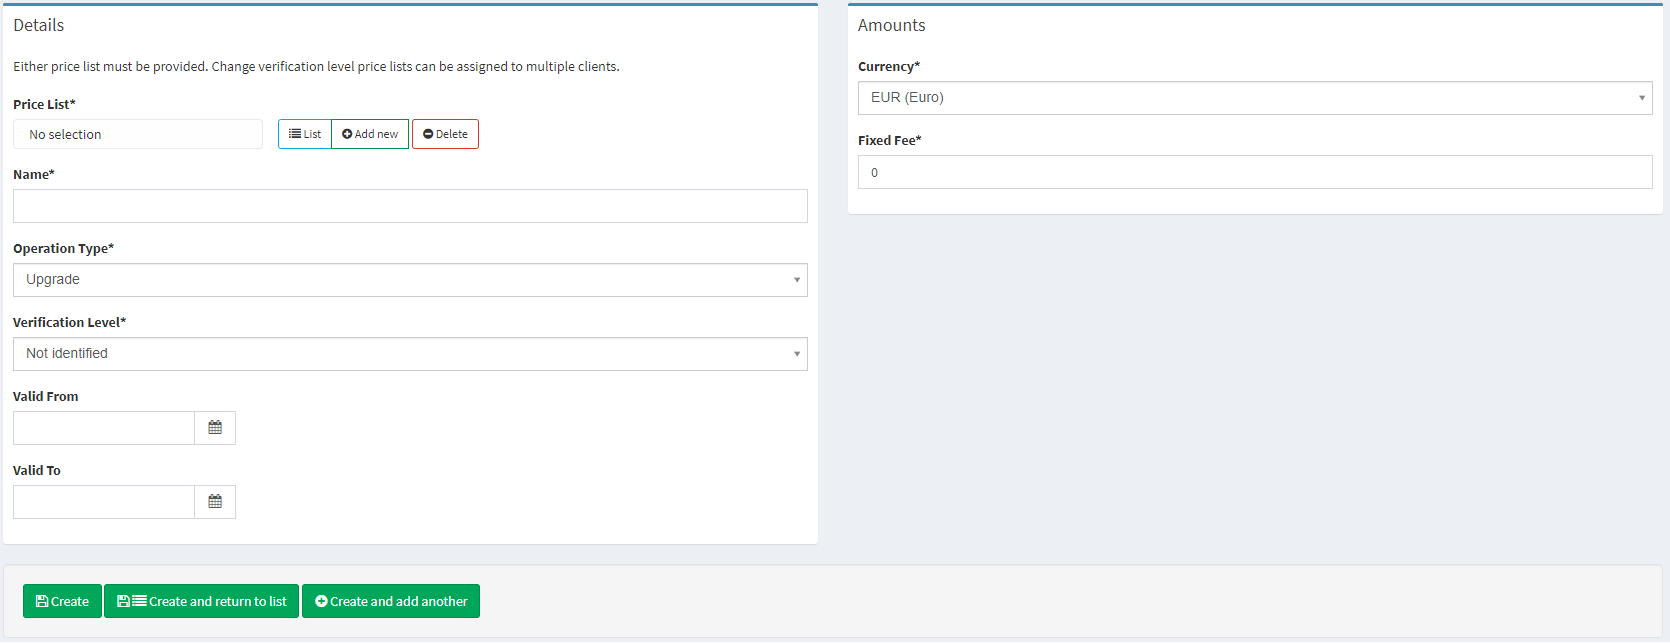
Upgrade fee
To create a limit pack for the verification level
Navigate to the Limits tab in the Banking sidebar.
Click Add New in the top-right corner.
Select a Client Verification Level to set the Limit for. It is strongly recommended to configure the limit pack for each verification level for advanced testing purposes.
Define threshold details.
Refer to Limits for additional details on the parameters
The created Limit is assigned to clients automatically depending on their verification level.
It is strongly recommended to configure the limit pack for each verification level to perform manual testing in future.
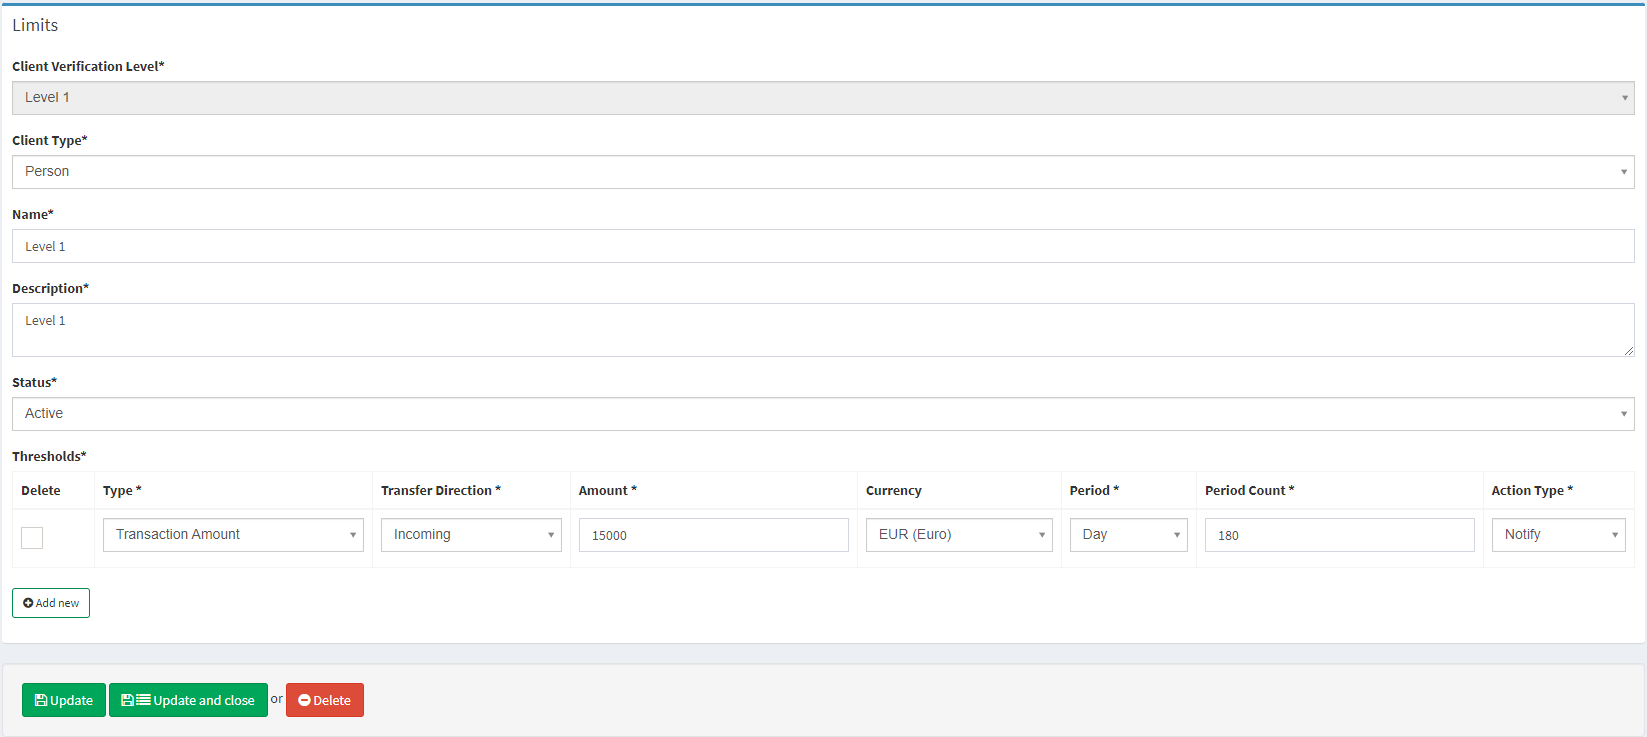
Limit pack
Configuring callback
The callback functionality allows Sumsub to provide verification results to Crassula. The verification results are required to syncronize verification statuses between the provider’s system and Crassula UI.
To enable the callback
Request a callback link from a Crassula manager.
Provide Sumsub with the link to callback after provider verification.
Testing the integration
Once the configuration is complete, it is recommended to perform manual testing before promoting the functionality. The following example describes KYC checks for a person’s profile.
To test the verification process
Create a personal profile.
Validate the profile email and phone number.
The Sumsub validation will start for the BasicKYC level.
Confirm the profile validation manually.
Navigate to Sumsub Dashboard > Applicants.
Click the new record in the list to open the details.
Click Start manual check.
Click Approve.
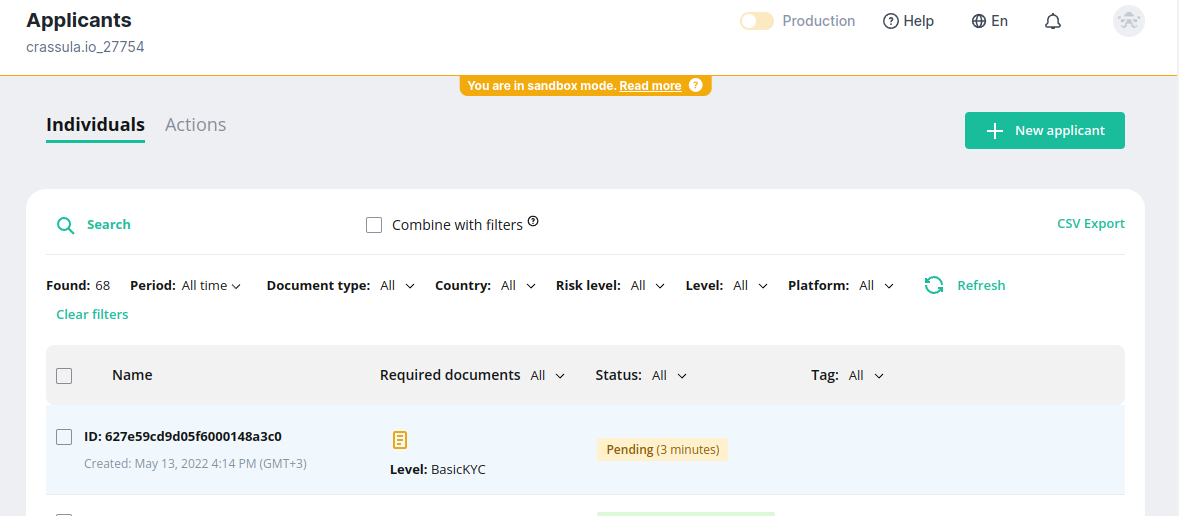
Once Sumsub sends a callback to the back-end, make sure the following is fulfilled:
The client verification level will be changed to Level 2 (Silver for client Web Interface).
Client verification status is changed to
Identified.
To test the verification level upgrade from Silver to Gold
Navigate to the banking Web Interface and sign in as the test client.
Go to Settings.
Make sure the following requirements are fulfilled in the Tiers section:
The active verification level must be marked as Current.
There has to be a possibility to upgrade only to the next verification level—meaning that Tiers must be changed only step-by-step—Level 2 to Level 3.
A dialog window must be opened once you click Upgrade. The window contents must include the following:
The window must contain the list of limit thresholds that will be applied after the upgrade.
The window must contain the drop-down list for account selection to charge the fee from. The functionality will be available if a price list is configured previously.
The drop-down list must show only accounts in the currency corresponding to the fee currency. The functionality will be available if a price list is configured previously.
The fee amount must be shown in the action button name. The functionality will be available if a price list is configured previously.
The upgrade must not be performed when the client’s account balance is not sufficient to charge a fee from. The functionality will be available if a price list is configured previously.
Approve the documents from the Sumsub dashboard.
Navigate to Sumsub Dashboard > Applicants.
Click the client record in the list to open the details.
Click Start manual check.
Click Approve.
Once the documents are sent to Sumsub, the upgrade fee (if present) is charged to the selected account. The fee is charged synchronously.
Integrating Sumsub with a Custom Frontend
For customers who have their own frontend, here’s how you can configure your interaction with Sumsub:
Find Active Identification Request:
Use the API to find an active Sumsub identification request:
CSSGET: /api/clients/{client_id}/identification-requests?provider=sumsub&state[0]=0&state[1]=1&state[2]=4&limit=1If none exists, create one:
CSSPOST: /api/clients/{client_id}/identification-requests PAYLOAD: { provider: "sumsub" }
Retrieve Provider Details:
Obtain token and state information:
CSSGET: /api/clients/{client_id}/identification-requests/{identification_request_id}/provider-details
Initialize Sumsub SDK:
Display the Sumsub SDK widget when
idCheck.onInitializedis triggered.
Handle Document Submission:
Upon document submission (
idCheck.onApplicantSubmittedoridCheck.onApplicantResubmitted), record this via the API:CODEPUT: /api/clients/{client_id}/identification-requests/{identification_request_id}/submit
Monitor Status Changes:
Use
idCheck.onApplicantStatusChangedto checkreviewStatusandreviewResult. Re-fetch client info and redirect as needed.
Error Handling:
Handle and display errors using
idCheck.onError.
Reference
Sumsub Guides: https://sumsub.com/guides-reports/
In case of urgent questions, create an internal request. See How to create a request for details.
.png)