.png)
Overview
Limits define the amount and the number of transactions allowed for the Client. The limitations depend on a Verification level set for the end-user; therefore, a Client increases their limits by means of improving their Verification level and providing additional identification documents.
The Limits tab provides the list of all limitations applied to end-users.
Related pages
Opening the item
Follow the steps below to access a limit created:
-
Navigate to the Admin Panel.
-
Click Banking on the left sidebar.
-
Go to the Limits menu item to open the limits List.
-
Click Show or Edit in the line of a limit to open the limitation details.
How to create a Limit
To create a Limit
-
Navigate to the Limits tab.
-
Click Add New in the top-right corner.
-
Select a Client Verification Level to set the limit for, see Identification requests for details. The parameter can also be used to define a Tier level for the limit.
-
Select a Client Type.
-
Select a Person type or Company type depending on the client type selected in the previous step. The field is optional and can be used to narrow down the list of clients the limit should be applied to At least one dictionary must be configured. See Dictionary for details.
-
Type in the limit name in the Name field.
-
Add a description in the Description field.
-
The limit status is Active by default. Disable the limit if you do not need it active once it is created.
-
Click Add New to add a threshold for transactions or transfers.
-
Fill in the Thresholds details (See the Configuring the component section for parameters required for threshold configuration).
-
Click Create to confirm the limit initiation.
Assignment priorities
The created limit is assigned to clients automatically according to the following priority parameters from highest to lowest:
-
Client type: Person or Company.
-
Client subtype: Tier levels defined in Dictionaries.
-
Client verification level.
The verification level correlates with the client identification stage:
-
Level 0 (not verified)
-
Level 1 (email and phone number verified)
-
Level 2 ( email, phone number, and documents verified by Sumsub service provider)
-
Level 3 (the level is set manually if an additional verification level is required, for example, address verification)
-
Level 4 (the level is set manually if an additional verification level is required, for example, proof of funds)
-
Level 5 (custom requirements that can be used to extend the limits provided; the functionality can be enabled in the system configs).
-
Transactions are restricted for Level 0 and Level 1. Such transactions remain on hold until the user goes through the KYC process.
-
If there is no limit defined for a verification level, the system will consider the limit of a lower level as active. For example, if a limit configuration is missing for the Verification Level 2, the limit of the Verification Level 1 will be applied by default.
-
If a limit is crossed by a personal threshold, the one with lower values will be considered for a corresponding profile.
To delete a threshold
-
Navigate to the Limits tab.
-
Select a limit for configuration and click Edit.
-
Select a checkbox in the Delete column to specify which threshold is to be removed. The selected threshold will be visible in the list until confirmation.
-
Click Update to confirm the changes.
To delete a Limit
-
Navigate to the Limits tab.
-
Select a limit for configuration and click Edit.
-
Click Delete in the bottom sidebar to remove the whole configuration.
Component parameters

|
Parameter |
Description |
|---|---|
|
Client Verification Level |
The column demonstrates the level names created previously. |
|
Client Type |
The column defines whether a Level is applied to a Private Person or a Company. |
|
Name |
The column includes names set for the Levels in the list. |
|
Status |
The column shows whether a limit is Active or Disabled. The limit status can be changed in the Edit mode. |
|
Created at |
Date and time of creation. |
|
Action |
|
|
Checkboxes |
The parameters are used for limit deletion. Select the limit or All Elements checkbox and click Ok to delete the selected elements. |
|
Download |
The list of limits is available for download; choose the export format type and click Download to get the list in the corresponding file type. |
|
Add new |
Create a limit manually; see the following sections for details. |
|
Help |
Click to access the current page right from the Admin Panel. |
Configuring the component
Limit details is the main panel of limit information display and editing. The Details include the same information fields as the fields used in limit creation.
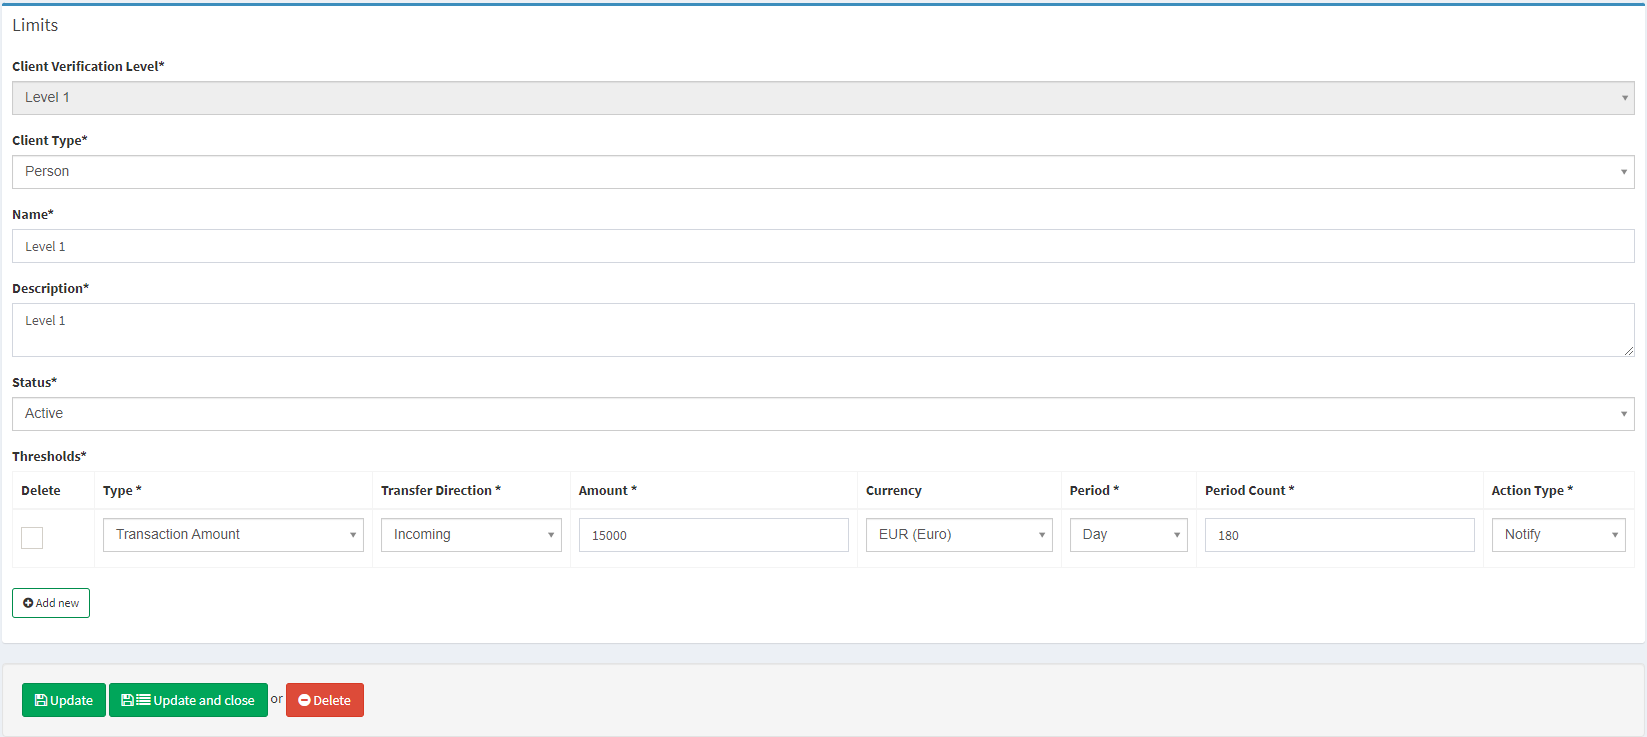
|
Parameter |
Description |
|---|---|
|
Client Verification Level |
Defines the Client verification level the limit is applied to. The verification levels correlate with the Client identification stage (not available for editing):
Transactions are restricted for Level 0 and Level 1. Such transactions remain on hold until the user goes through the KYC process. |
|
Client Type |
Defines whether the limit is applied to a Private Person or a Company. |
|
Name |
The limit name set while creation. Available for editing. |
|
Description |
The limit description used for internal details. |
|
Status |
Defines whether the limit is Active or Disabled. Any disabled limit is available for activation. |
|
Thresholds |
The key information on the limit defines the constraints applied to clients of the defined verification level.
|
|
Help |
Click to access the current page right from the Admin Panel. |
Useful tips
Monitoring rules
ComplyAdvantage, as a service provider, can also detect configurations related to Hard stop and Soft stop monitoring rules. You can set White and Black list Acton IDs for limit thresholds to define their advanced behavior. The configuration is defined as follows:
-
The Black list setting is always considered to be of a higher priority compared to the whitelist setting.
-
If none of the White and Black list settings are set for a monitoring rule, all transactions pass the threshold.
-
If only the Black list setting is set for a monitoring rule, the transactions with a corresponding
ActionIDare hard-stopped. -
If only the White list setting is set for a monitoring rule, the transactions without limit breach alerts or with a corresponding
ActionIDpass; all other transactions are hard stopped.
The functionality is enabled in the system configs; contact your manager for additional details.