.png)
Overview
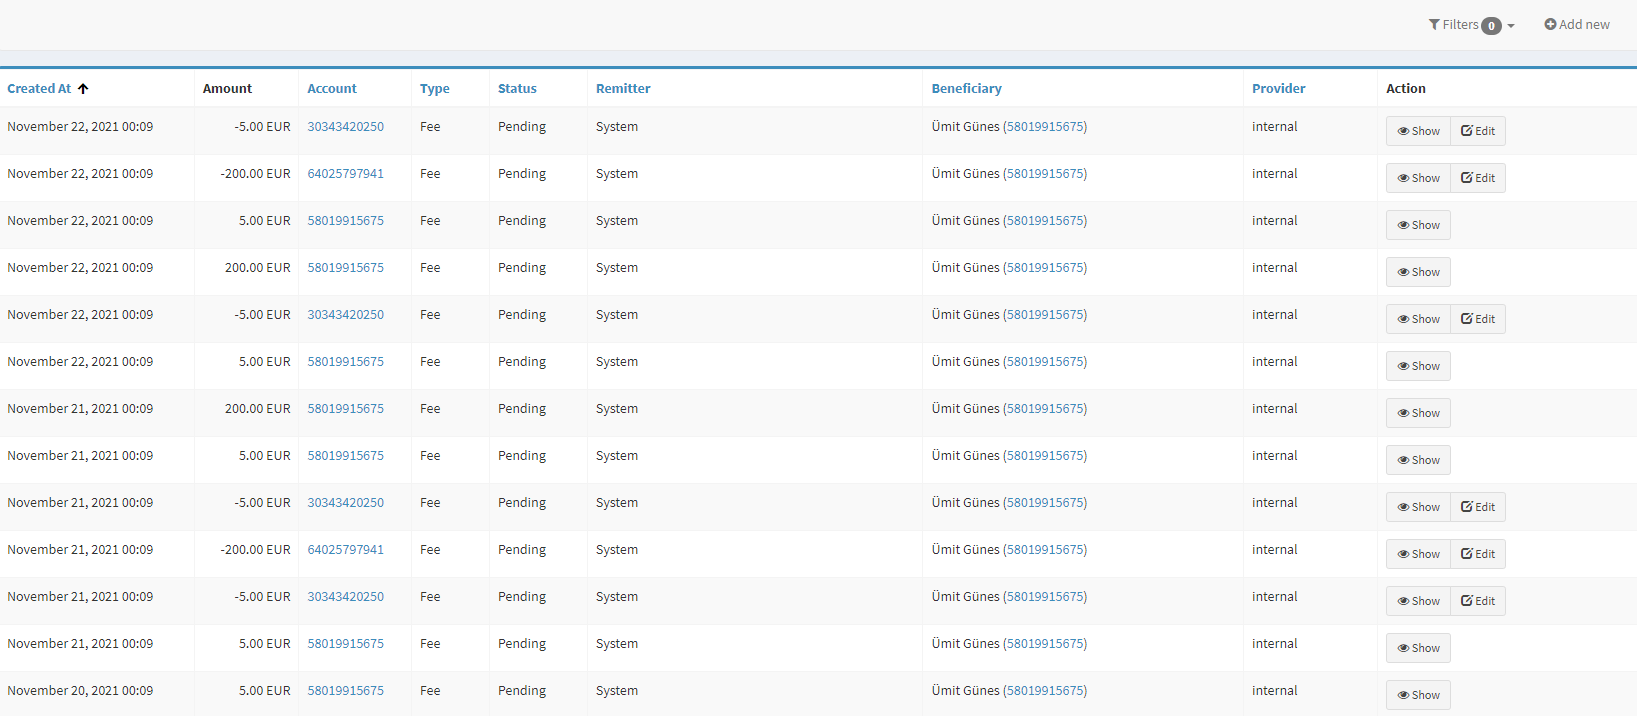
The Transactions tab provides the primary list of transactions and the related details (such as sums, accounts, status, and beneficiaries).
All transactions are created by Clients and executed by external service providers.
There are three transaction tabs in the left sidebar (the interfaces are identical):
-
Transactions: The tab includes the primary list of transactions and the related details (such as sums, accounts, status, and beneficiaries).
-
Transactions (pre-approval): See Transactions (pre-approval) for details.
-
Transactions (action required): See Transactions (action required) for details.
The page covers both main transfer types:
-
Internal transfer—a payment made within the Crassula system without using external API. Such payments do not require an external service provider to process them. For example, such payments are payments between own virtual accounts or payments to another WL client.
-
External transfer—a payment made by means of an external service provider and its API. For example, such payments are SEPA or SWIFT payments from real accounts processed by Clearbank or Railsr.
Related pages
Opening the item
Follow the steps below to access transaction details:
-
Navigate to the Admin Panel
-
Click Banking on the left sidebar.
-
Go to the Transactions menu item.
-
Click Show in a line to open transaction details.
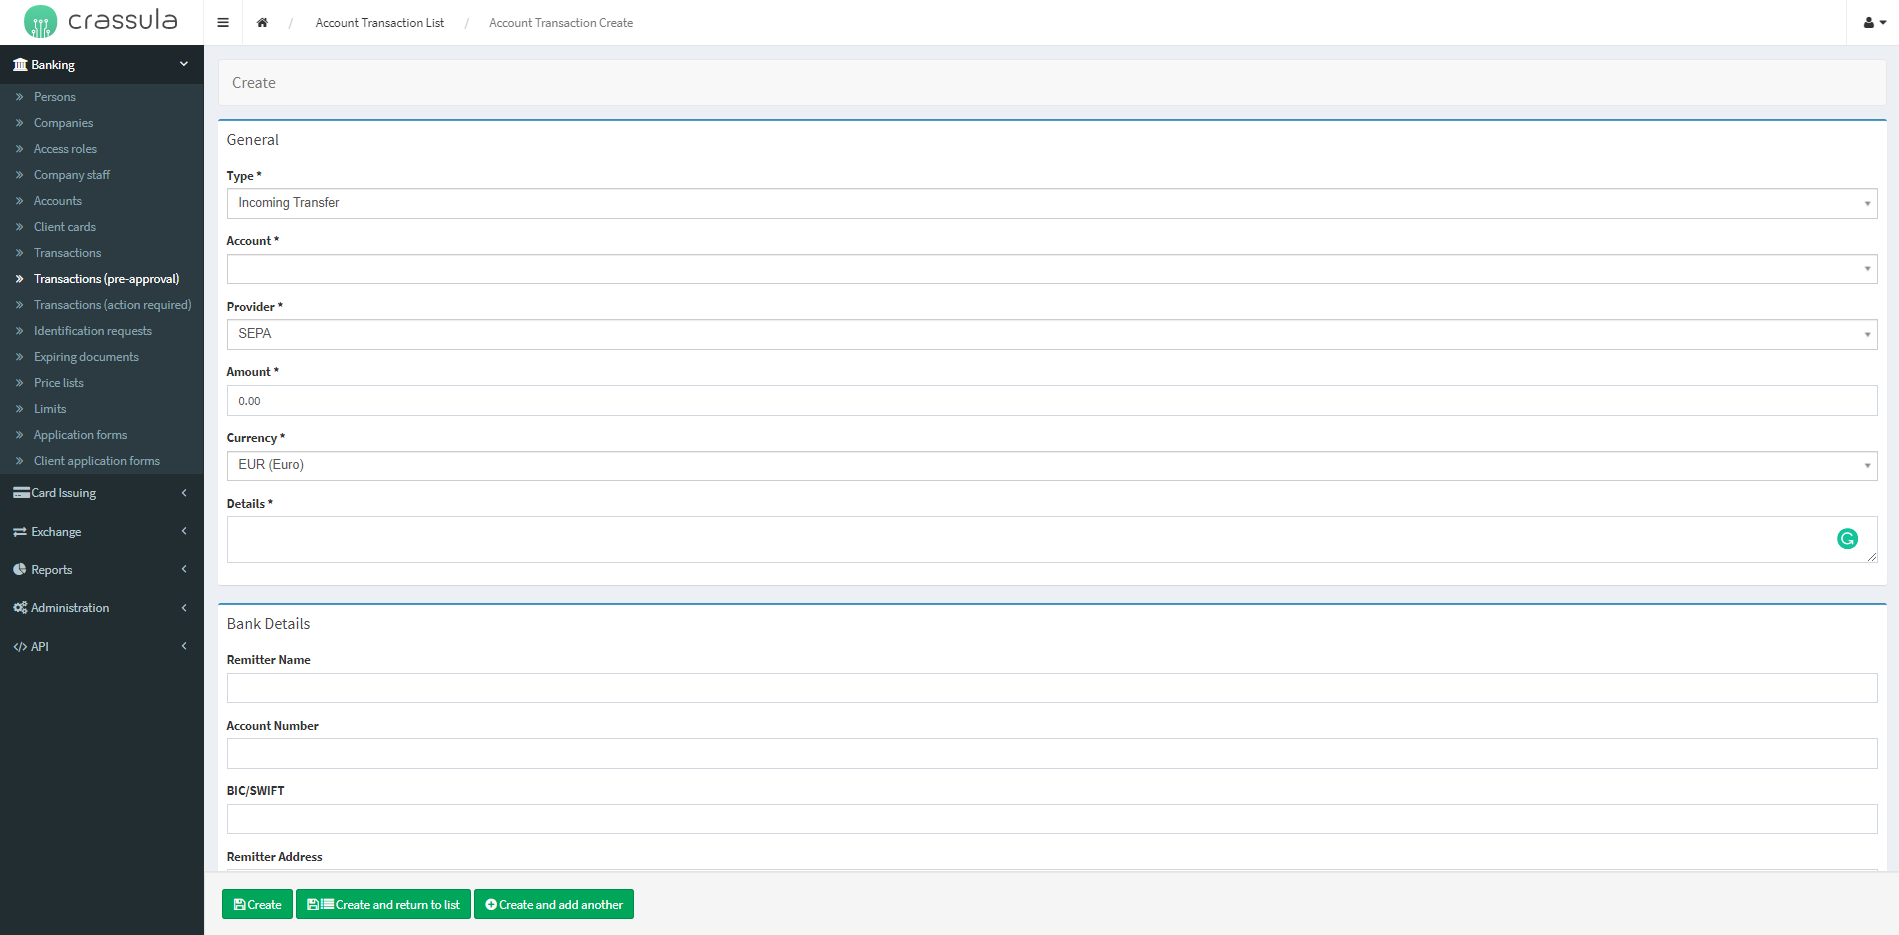
How to create a transaction
To create a Transaction manually
-
Navigate to the Admin Panel.
-
Click Banking on the left sidebar.
-
Go to the Transactions menu item
-
Click Add New in the top-right corner of the tab.
-
Complete the General form to set the following parameters:
-
Transaction type
-
Incoming transfer
-
Outgoing transfer
-
Internal transfer
-
Deposit/Withdrawal
-
Fee
-
-
Account number/name.
-
Service provider.
-
Amount and currency.
-
Details (the information provided for the transaction described in the account settlement).
-
-
Fill in the Bank Details for both sides.
-
Click Create to apply the changes and generate the transaction.
All transactions are created automatically by service providers; therefore, the transaction creation functionality is designed for testing and/or exceptional cases, such as manual operational needs (for example, charging unique fees).
How to decline a complete transaction
The functionality is different from the Pre-approval decline: all related fees are not declined automatically, and the transaction status will not be updated on the service provider side.
See Transactions (pre-approval) for details on Pre-approval decline.
Currently, the following limitations are applied and can be changed in the upcoming releases:
-
Transaction decline is supported by the following providers: ClearJunction, Clearbank, Railsbank, CurrencyCloud, and Fireblocks.
-
Transaction decline is not supported by the following providers: Bitgo and Litas_sepa (Centrolink).
Crassula Admin Panel allows you to decline completed transactions.
Before declining a transaction, make sure you are provided with one of the following access rights:
-
Super Admin (all access roles are applied)
-
Transactions: List, Create, Edit, Show, Export, and Decline roles.
To decline a complete transaction
-
Navigate to Banking in the Admin Panel.
-
Open the Transactions window.
-
Click Show in the line of a transaction to decline.
-
Make sure the transaction status is Complete.
-
Click Actions in the top right corner and select the Decline option from the drop-down menu.
-
State the reason for the decline in the Decline reason field. Stating the reason is mandatory and validated to be between 3 to 228 characters.
-
Click Decline to manually decline a transaction on the White Label’s side.
-
The transaction status will be changed to Declined.
-
You can change the status back to Complete in the Edit mode if necessary.
Component parameters
|
Parameter |
Description |
|---|---|
|
Created at |
The column demonstrates the date and time of transaction creation. |
|
Amount |
Includes the transaction’s sums. |
|
Beneficiary |
The transfer beneficiary names and account numbers. |
|
Provider |
The service provider delivering the transaction execution. |
|
Action |
|
|
Filters |
Most of the filters correspond to the component parameters, though there are a few special filters:
|
|
Add new |
Create a transaction manually; see the previous section for details. All transactions are created automatically by service providers; therefore, the transaction creation functionality is designed for testing and/or exceptional cases, such as manual operational needs (for example, charging unique fees). |
|
Help |
Click to access the current page right from the Admin Panel. |
Configuring the component
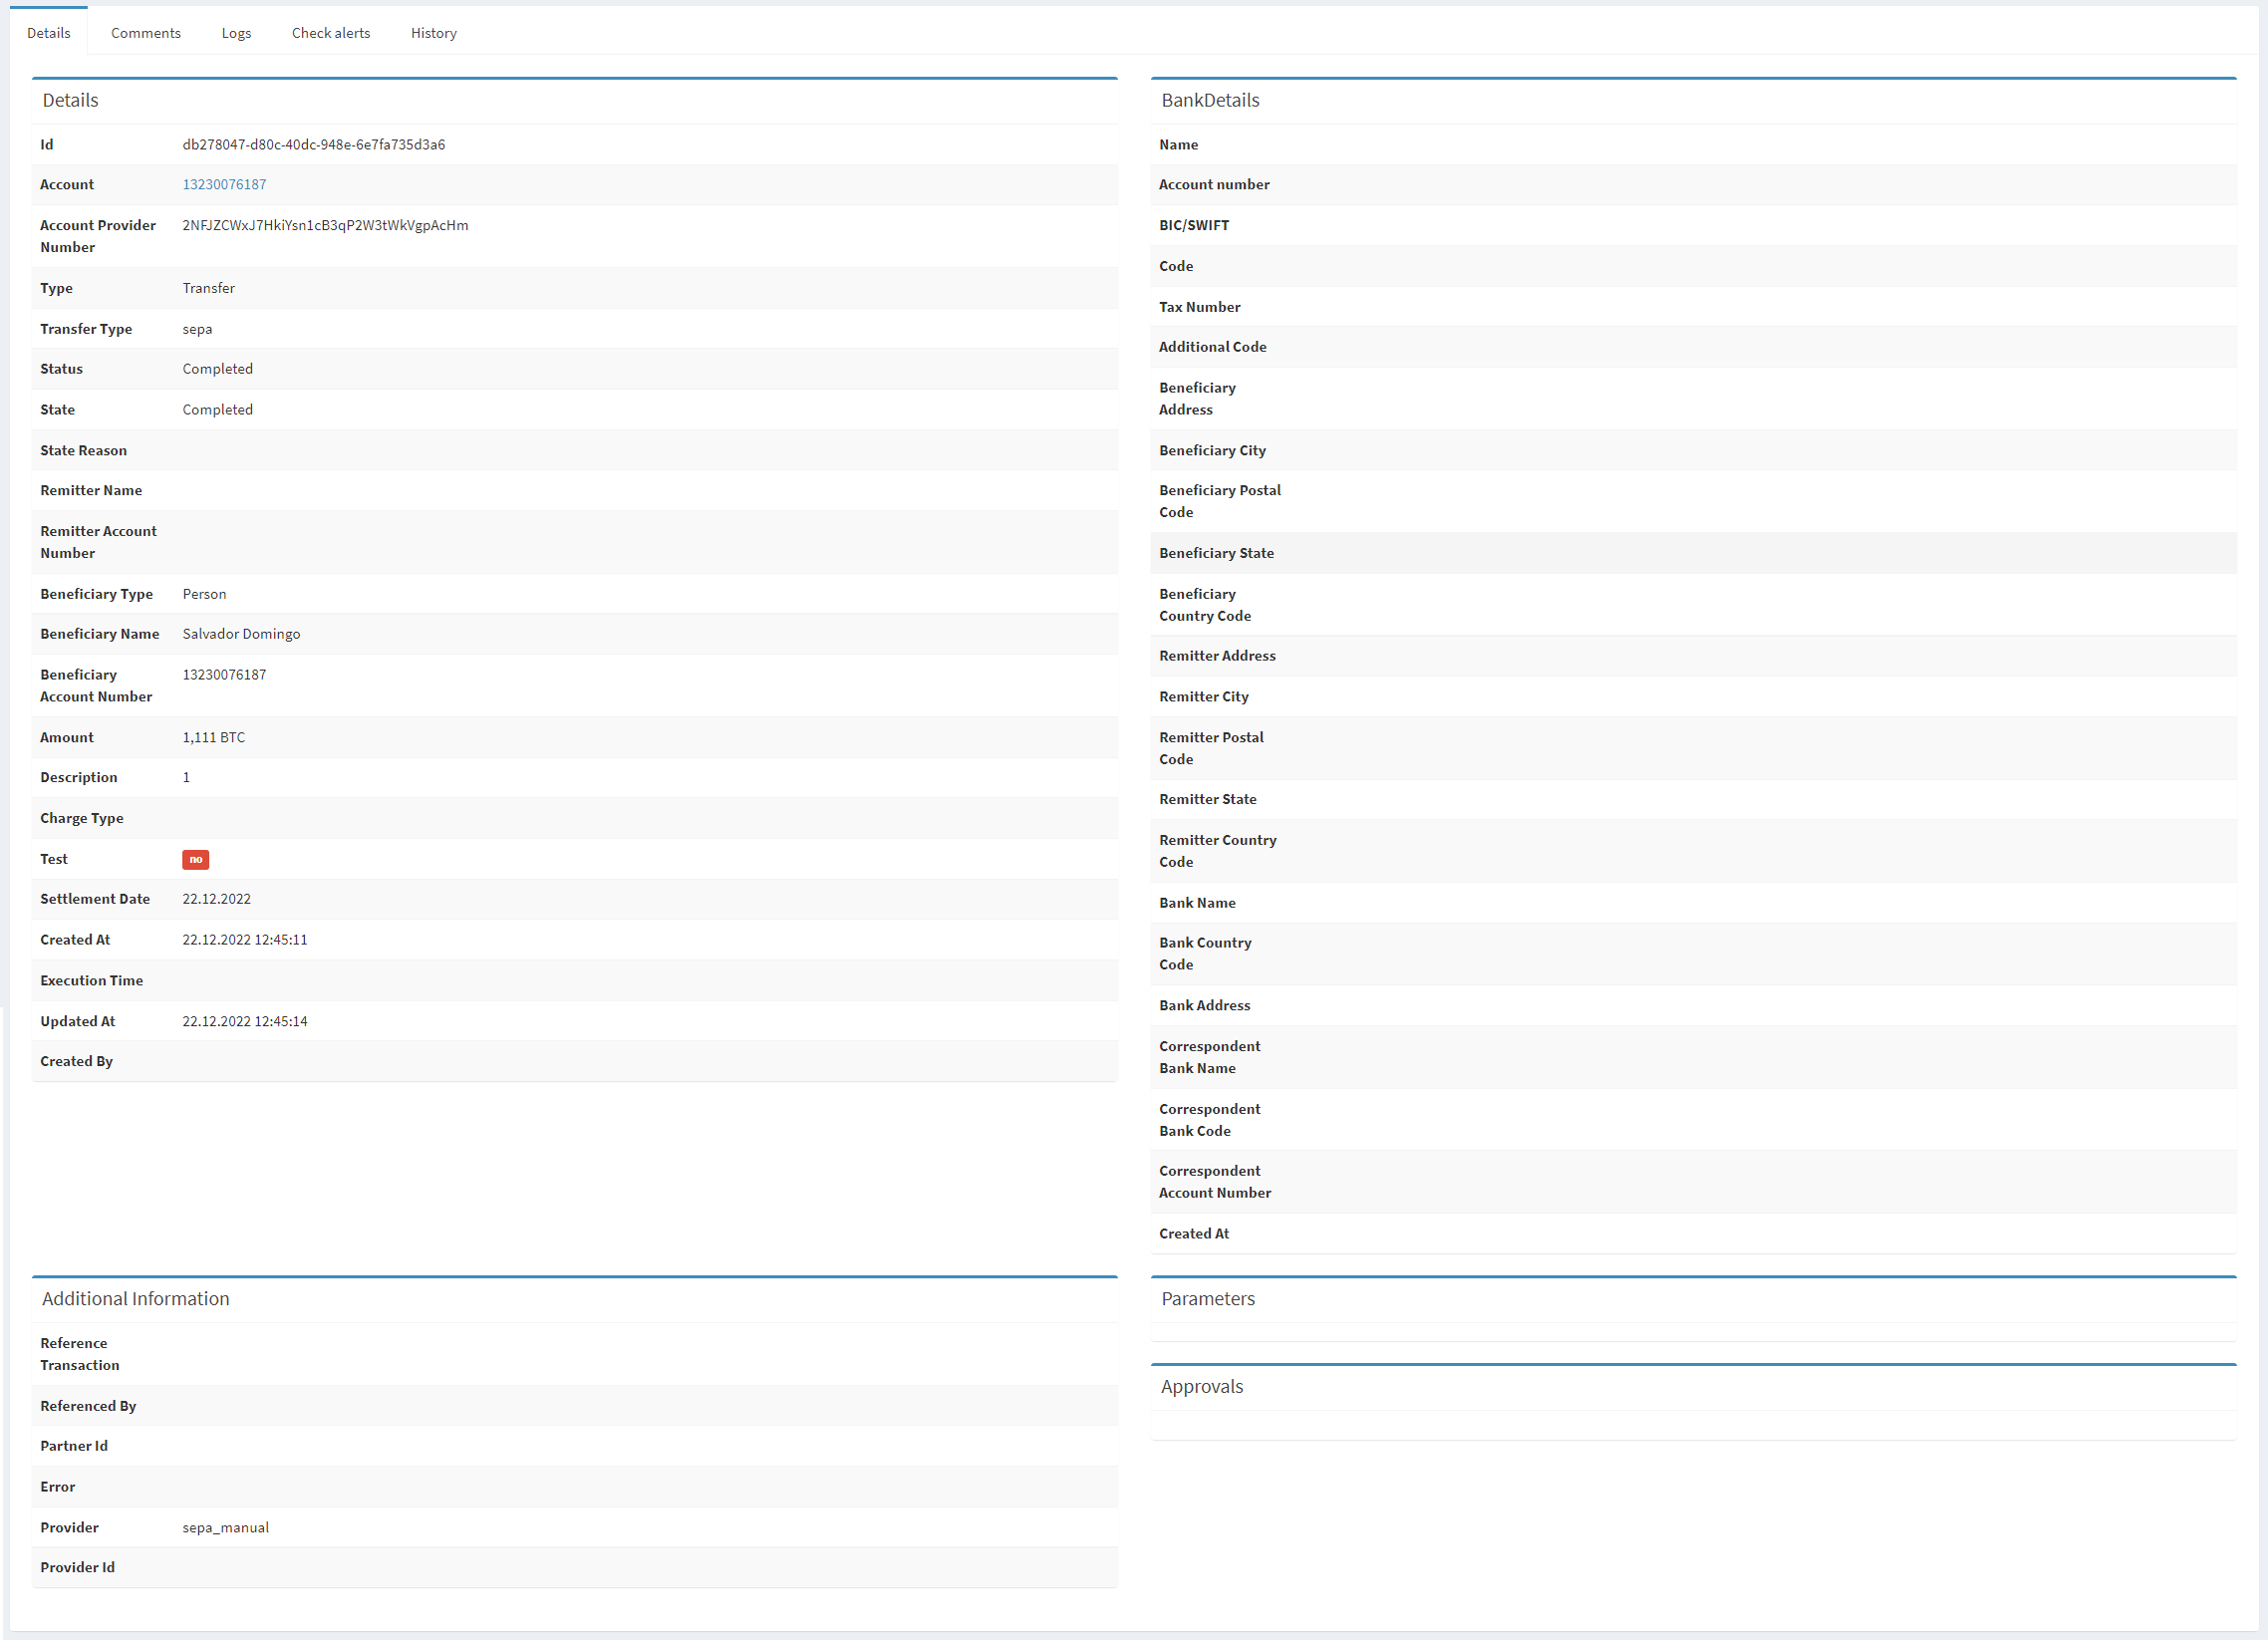
There are two panels for transaction review and editing.
|
Parameter |
Description |
|---|---|
|
Transaction details |
|
|
Details |
The field includes general transaction information, including an internal ID, related account numbers, Clients, sums, and currencies. |
|
Bank Details |
Demonstrate the essential banking details of the beneficiary and remitter sides, including SWIFT, IBAN, and addresses. There are a few optional parameters:
|
|
Additional information |
Provides the information on the transaction service provider and a reference transaction (if provided). |
|
Parameters |
The field provides additional parameters received from the service provider; for example, |
|
Reference Transaction |
A “reverse” of the initial transaction. Every transaction charged from an account will be credited to another one. For example, a fee charged from a user will be transferred as a commission to a Bank cash account – in this case, the credit transaction on the cash account is a reference transaction of the initial fee. |
|
Approvals |
The field demonstrates the list of pre-approvals if applied. |
|
Top sidebar |
Navigate between Details, transaction Logs, Comments, and Check alerts using the top-side menu. |
|
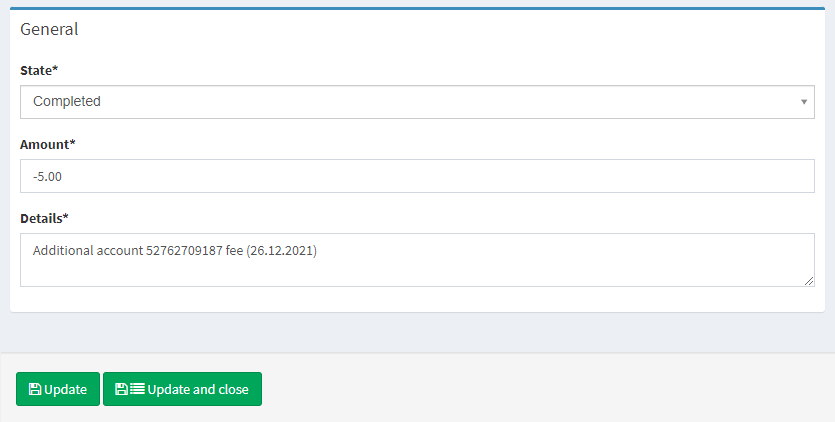
Transaction editing |
|
|
State |
Transaction state indicates whether a transaction is in draft, pending approval, completed, or declined. The State field can be locked to prevent manual edits, as the service provider controls the parameters for executing transfers. Contact client support to disable manual editing for this field. Only change the value in exceptional cases. If you manually change the transaction state, the update will apply only within the Crassula system. The following list defines all transaction states with corresponding API codes that development teams can use: |
|
Amount |
Transaction amount. |
|
Details |
This field allows you to correct banking details in case of errors or typos. Once a transaction is complete, its banking details can no longer be edited. To make changes, the transaction state must be manually rolled back. |
|
Help |
Click to access the current page right from the Admin Panel. |