Skip table of contents

Banking Web Interface

Banking Web Interface is a visualization instrument that provides access to all the necessary Banking services, starting from account opening and ending in exchanging cryptocurrencies. The following guide leads the user through the essentials of Banking Web Interface and provides instructions on the actions available.

The Web Interface design varies depending on the visual solutions of the White Label providing the service. Nevertheless, the interface structure and functionality are implemented according to the following guide.

Overview

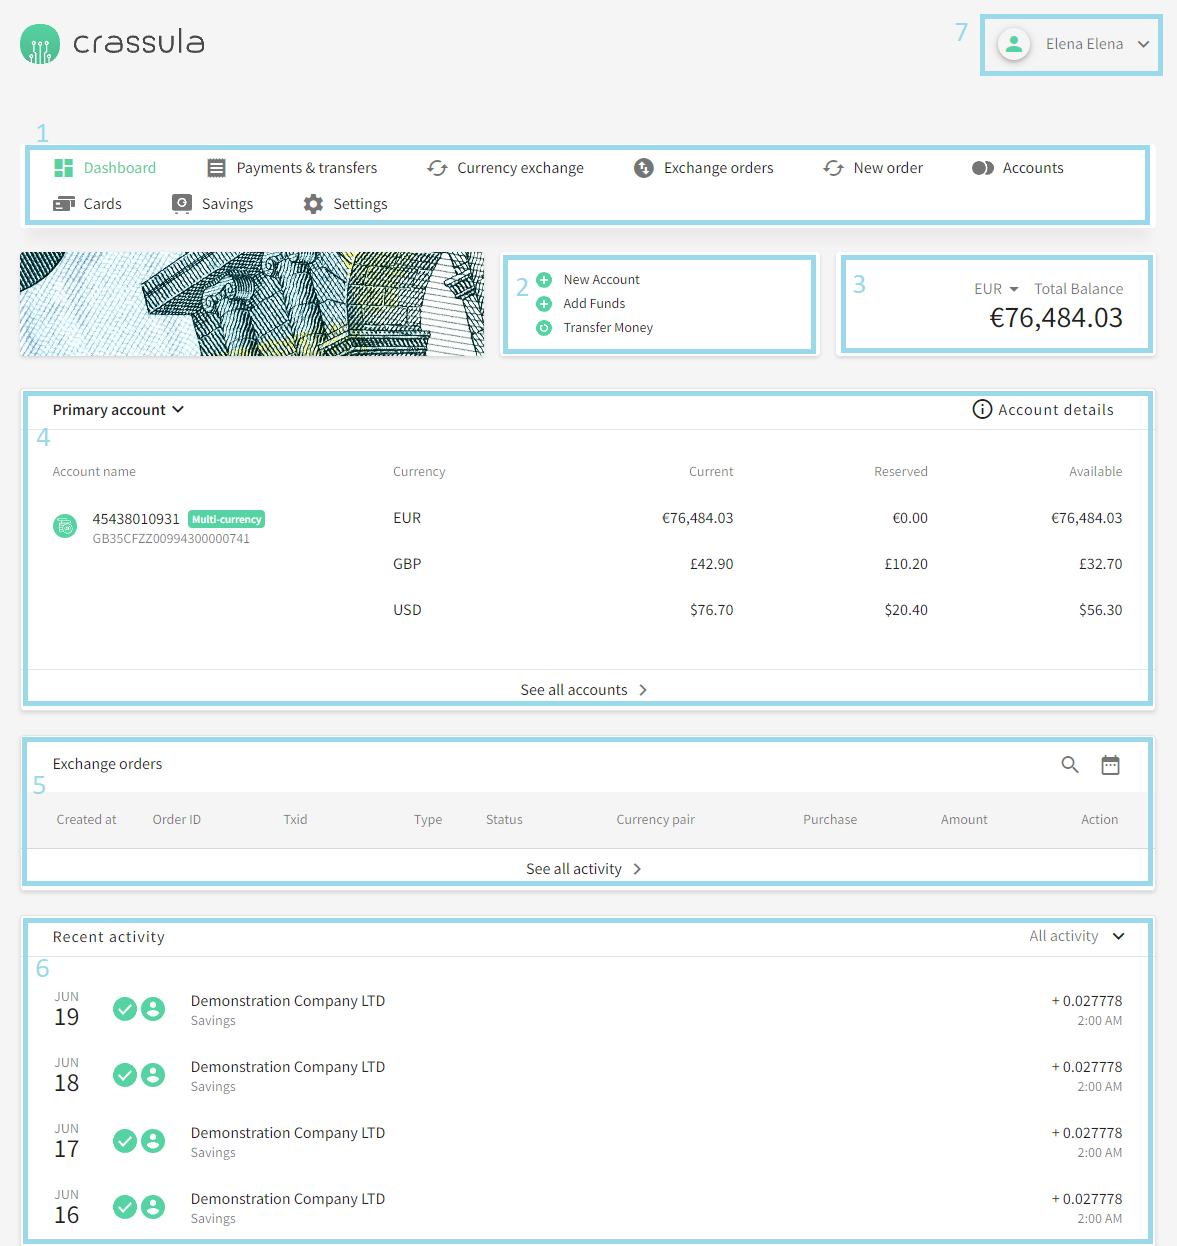
The Web Interface consists of several functionality fields that provide quick access to all the necessary details of your accounts in <White Label>. See the image below to navigate across the interface:

  1. The Navigation sidebar is the main navigation instrument to switch between the Web Interface functionalities.

  2. The Quick Access field includes the most frequently used actions – opening a new account, topping up, and transfers.

  3. The Total balance field demonstrates the sum of funds from all the opened accounts.

  4. Primary account details and the linked cards.

  5. Recent currency exchange orders.

  6. Transaction history demonstrates recent transactions including transfers, fees, and card transactions.

  7. Profile option allows to switch between personal and business profiles without signing out of the Web Interface.

Signing up

An existing profile is required to have access to all the Web Interface functions. Follow the steps below if you have not registered yet:

  1. Navigate to <link>.

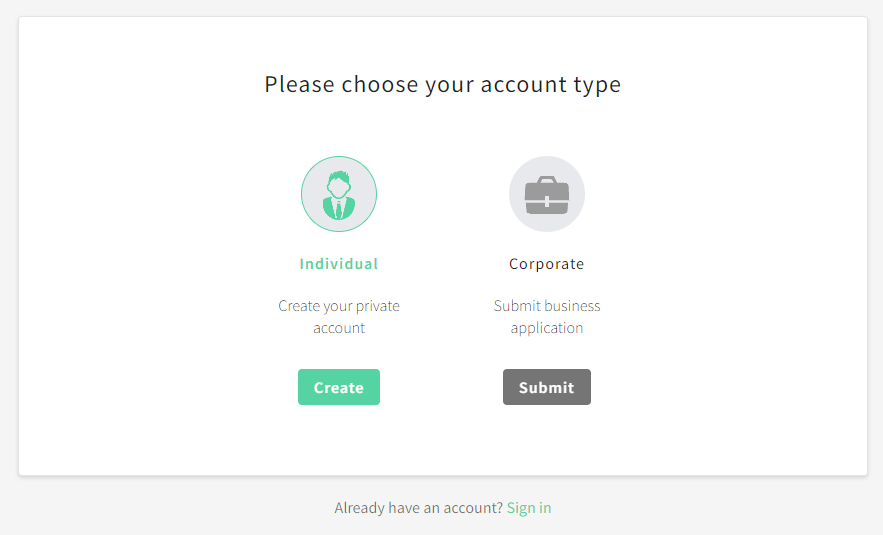
  2. Click Sign Up below the form to start creating your profile. A page with profile types will be opened.

  3. Click Create to open a Private account. The Sign-Up form will be opened.

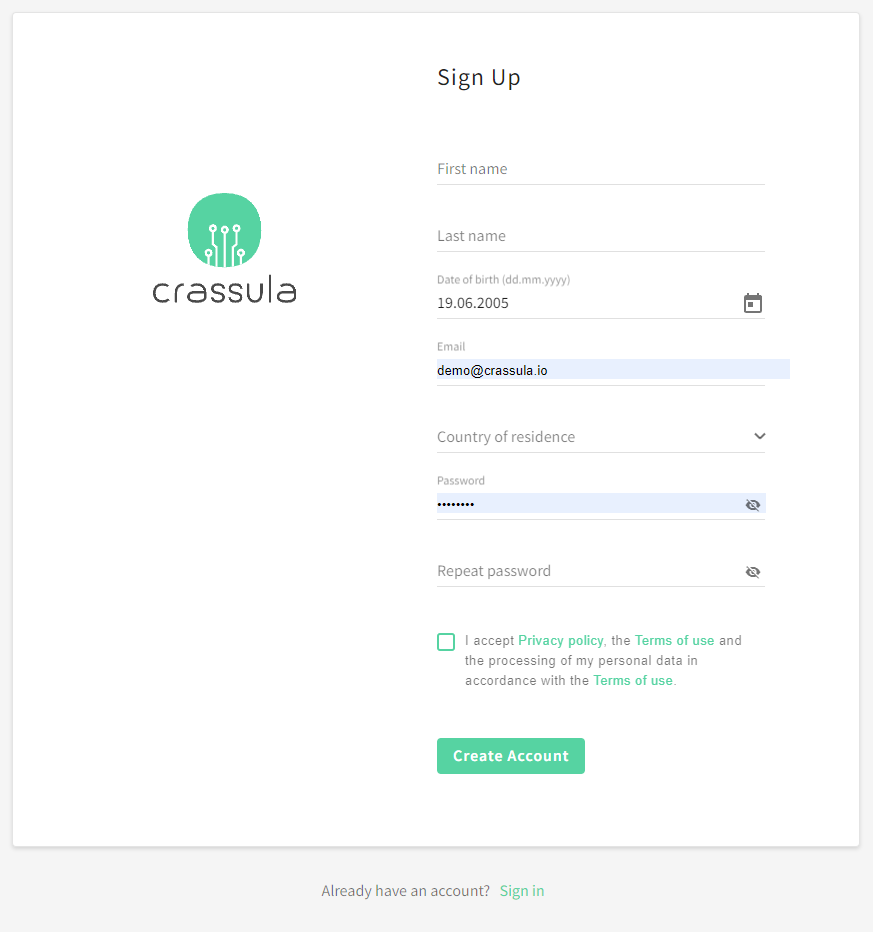
  4. Fill in your personal details and acquaint yourself with the terms of use provided below.

  5. Click Create Account to submit the form.

  6. Your profile is successfully created and the Primary account is opened automatically.

  7. Check your email for the identification link provided by the service. Follow the instructions to verify your email address.

  8. Once your email is verified you will be navigated to a phone verification link. Enter the verification code sent to your phone to verify your contacts.

  9. Navigate to the document verification page using one of the following methods:

    1. A link for document upload.

    2. A QR-code for online video verification.

  10. Complete the questionnaire (optional).

  11. Wait for the document approval (takes up to several minutes).

  12. Once the document approval is complete, the primary account is activated.

  13. Navigate back to the Sign-in page to log in using the newly created credentials.

It is possible to Sign in to the Web Interface before completing the identification process, though such actions as transfers, currency exchange, and card issuing will be restricted.
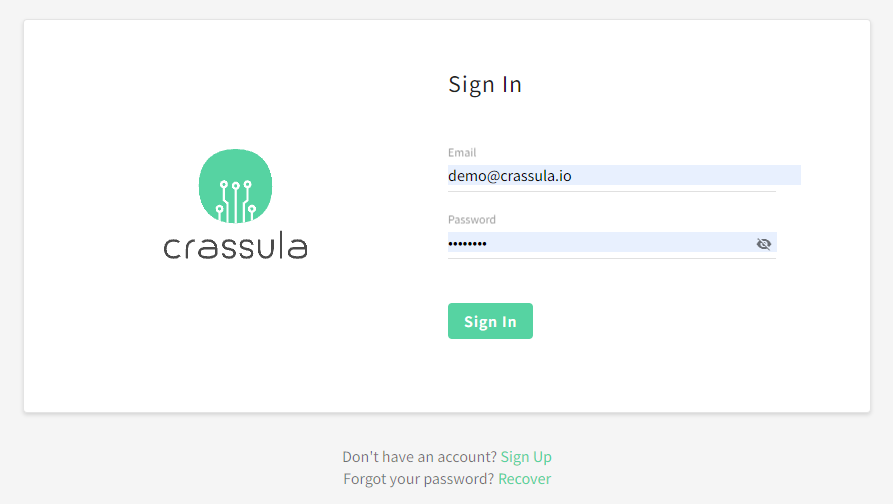
 

Signing in

If you already have an account, follow the steps below to sign in:

  1. Navigate to <link> .

  2. Fill in your credentials for authorization.

  3. The Web Interface will be opened

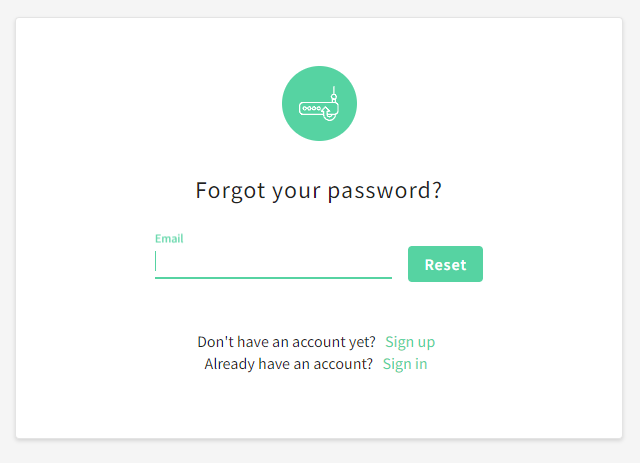
If you forgot your password, the recovery process is executed as follows:

  1. Click Recover below the Sign-in form. The password recovery window will be opened.

  2. Enter your email address and click Reset.

  3. The password recovery email will be sent to your email - follow the instructions to reset your password.

  4. Navigate back to the Sign-in page and log in using the updated credentials.

Accounts

The Primary account is always opened automatically once the user profile is created. All additional accounts are not limited in quantity and can be opened manually via the Web Interface.

To open an account

  1. Click the Accounts tab in the top sidebar. The window with the list of existing accounts will be opened.

  2. Click New Account in the top sidebar above the list of accounts. The action is also available in the quick-access field of the Dashboard.

  3. Set the account name in the free-text field.

  4. Click Create Account to confirm account opening.

  5. Once the new account is opened, its details will appear in the All Accounts list.

Click Account details in the list of active accounts to access the account details, such as Beneficiary Name, Bank, and IBAN.

Account information remains in the <White Label> system even if the account is closed by Client or Administrator.

Consent management

The Consent management functionality empowers users to maintain control over their personal and financial data. It also allows users to grant or revoke permissions for the bank to access and process information related to their accounts, balances, and transactions, ensuring user privacy and complying with financial regulations that require explicit user consent for data processing.

Managing consent

Perform the steps below to provide or revoke you user’s consent:

  • Navigate to the Accounts>Consents tab;

  • Select the permissions by clicking (checking or unchecking) corresponding check boxes in the table;

  • Click Submit at the bottom of the table to submit or revoke your consent;

  • In the 2FA dialog, enter the verification code to complete the procedure.

For more information on consent management, please see the PSD2/PSR compliance section.

Savings

The Savings tab provides the list of all Vault accounts created. A Vault is an interest-bearing bank account that has a pre-configured maturity date. The money must remain in the account for a fixed period of time in order to earn the stated interest rate.

To open a Vault account

  1. Click the Savings tab in the top sidebar. A window with the list of existing Vault accounts will be opened.

  2. Click New Saving account in the top sidebar above the list of accounts.

  3. Set the account name in the Set vault name field.

  4. Select a Vault rate from the drop-down list.

  5. Select your account to transfer funds from.

  6. Enter the deposit amount and select the account currency.

  7. Click Create Vault to confirm account opening.

  8. Once the new account is opened, its details will appear in the All Savings list.

When withdrawing funds from a savings account you can use the Withdraw all button to withdraw the maximum available amount.

Vault account statements

Account statements are available for Vaults in the All Savings tab. You can download the statement for a selected Vault and access all the transactions starting from the first account deposit.

To access Vault transactions

  1. Click the Savings tab in the top sidebar. A window with the list of existing Vault accounts will be opened.

  2. Click Download in the information field of a necessary Vault account.

  3. Select one of the suggested file types from the dropdown menu.

  4. Open the downloaded file.

Top-up

The Web Interface provides a convenient way to deposit funds from external cards and accounts. Follow the steps below to top up your account:

  1. Click the Accounts tab in the top sidebar. The window with the list of existing accounts will be opened.

  2. Click Add funds in the top sidebar above the list of accounts. The action is also available in the quick-access field of the Dashboard.

  3.  Select the account to top up from the drop-down list.

It is possible to skip the account selection step by navigating to Accounts and clicking Add funds next to the account you need to top up. You will be redirected right to the top-up page of the corresponding account.

Deposit from a debit or credit card

  1. Enter the sum to deposit in the You send field.

  2. Select the currency from the drop-down list.

  3. Fill in the details of a card to charge the sum from.

  4. Click Continue to confirm the transaction.

Manual bank transfer

  1. Select the type of transfer—Local (UK), European, or International—depending on the account type and service providers integrated. The corresponding account details will be opened.

  2. Select a payment method if you are using a local transfer.

  3. Click Print to send the details to a printing device or import them as a file.

  4. Fill in the provided account details when transferring funds from an external account.

Payments and transfers

Being a fully functioning Banking instrument, the Web Interface delivers several ways to execute transfers. Navigate to Payments & Transfers or click Transfer money in the quick-access field to see all options provided by the functionality.

History

The tab allows the user to browse all the transactions requested from their accounts. Navigate across the transactions and import the details using the actions above the list.

If a transaction is executed in cryptocurrency, any wallet address in the transactions list will be masked. It is possible to copy the whole wallet address as follows:

  1. Point the mouse cursor over the masked address.

  2. Click Copy.

Templates

The tab delivers a solution for creating templates. The transfer template is a time-saving instrument that provides a way to execute recurrent transfers from a previously created template.

To create a transfer template

  1. Navigate to the Templates tab.

  2. Click Create template.

  3. Select the template payment method:

    1. International transfer

    2. European transfer (SEPA)

    3. UK local transfer

    4. To another client

  4. Select an account from the drop-down list to transfer funds from.

  5. Enter the sum to transfer in the You send field.

  6. Select a currency from the drop-down list.

  7. Fill in the recipient details.

  8. Add a description and set the name for the new template. The minimum number of symbols is 6.

  9. Click Save to confirm the changes.

  10. The new template will be available in the Templates tab.

To my account

The tab allows the user to transfer funds between their own accounts.

To create a transfer between own accounts

  1. Navigate to the To my account tab.

  2. Select an account from the From account drop-down list to transfer funds from.

  3. Select an account from the To account drop-down list to transfer funds to.

  4. Enter the sum to transfer in the You send field.

  5. Select a currency from the drop-down list.

  6. Set the Schedule payment checkbox to create a recurring payment.

  7. Click Save to confirm the changes.

To another client

The tab allows the user to execute an internal transfer to a client within the same financial service. You can make payments to an existing  <White Label> client using their e-mail, phone number, or @username instead of account details.

To create a transfer to another client

  1. Navigate to the To another client tab.

  2. Select an account from the From account drop-down list to transfer funds from.

  3. Enter the sum to transfer in the You send field.

  4. Select a currency from the drop-down list.

  5. Define one of the following recipient details:

    1. E-mail

    2. Phone number

    3. @username

    4. Account number

    5. IBAN

  6. Add a payment description to define its purpose. The minimum number of symbols is 6.

  7. Set the Schedule payment checkbox to create a recurring payment.

  8. Set the Set template name checkbox to save the transfer details as a template.

  9. Click Save to confirm the changes.

Select a template from the Choose a template drop-down list, if one is present, to import the previously saved transfer details.

UK Local

The tab allows the user to execute a transfer inside the United Kingdom. The transfer requires general account details, such as the recipient’s name, account number, and sort code.

To create a UK local transfer

  1. Navigate to the UK local tab.

  2. Select an account from the From account drop-down list to transfer funds from.

  3. Enter the sum to transfer in the You send field.

  4. Select a currency from the drop-down list.

  5. Define the following recipient details:

    1. Fill in the beneficiary name in the Name field.

    2. Select a beneficiary type in the Type field.

    3. Select one of the Payment methods: FPS or CHAPS.

    4. Account details: the account number and sort code.

  6. Add a payment description to define its purpose. The minimum number of symbols is 6.

  7. Set the Schedule payment checkbox to create a recurring payment.

  8. Set the Set template name checkbox to save the transfer details as a template.

  9. Click Save to confirm the changes.

Invalid file id - a21aef2f-c88c-4a81-8585-9481c128f8e3

European (SEPA)

The tab allows the user to execute a transfer to a country inside the European Union. The transfer requires an extended list of account details, such as the recipient’s name, IBAN, and legal address.

To create a European transfer

  1. Navigate to the European tab.

  2. Select an account from the From account drop-down list to transfer funds from.

  3. Enter the sum to transfer in the You send field.

  4. Select a currency from the drop-down list.

  5. Define the following recipient details:

    1. Fill in the beneficiary name in the Name field.

    2. Select a beneficiary type in the Type field.

    3. Beneficiary address details: Address, city, state (if applicable), postal code, and country.

    4. Account details: IBAN.

  6. Add a payment description to define its purpose. The minimum number of symbols is 6.

  7. Set the Schedule payment checkbox to create a recurring payment.

  8. Set the Set template name checkbox to save the transfer details as a template.

  9. Click Save to confirm the changes.

International and Dynamic International

The International and Dynamic International tabs allow the user to execute a transfer to a country outside the EU and UK. The transfer requires the full list of account details, such as the recipient’s name, IBAN, SWIFT, and legal address.

To create an International transfer

  1. Navigate to the International or Dynamic International tab.

  2. Select an account from the From account drop-down list to transfer funds from.

  3. Enter the sum to transfer in the You send field.

  4. Select a currency from the drop-down list.

  5. Define the following recipient details:

    1. Fill in the beneficiary name in the Name field.

    2. Select a beneficiary type in the Type field.

    3. Beneficiary address details: Address, city, state (if applicable), postal code, and country.

    4. Account details: IBAN.

    5. Correspondent bank details (if provided): Name, account number, BIC/SWIFT.

  6. Add a payment description to define its purpose. The minimum number of symbols is 6.

  7. Set the Schedule payment checkbox to create a recurring payment.

  8. Set the Set template name checkbox to save the transfer details as a template.

  9. Click Save to confirm the changes.

Crypto

The tab allows to send crypto transfers from an existing crypto account. The transfer requires a crypto wallet address and a recipient’s name.

To create a crypto transfer

  1. Navigate to the New order tab.

  2. Select an account from the From account drop-down list to transfer funds from.

  3. Enter the sum to transfer in the You send field.

  4. Select a currency from the drop-down list.

  5. Define the beneficiary wallet address in the Cryptocurrency address field.

  6. Add a payment description to define its purpose. The minimum number of symbols is 6.

  7. Click Save to confirm the changes.

The Withdraw all button allows to withdraw the maximum available amount from the account. Fees are also considered when withdrawing funds from a crypto account; thus, only sums available for withdrawal will be suggested.

Drafts

The tab contains the details of all unfinished transfers created in the Web Interface. Select a draft and click Pay to initiate the payment.

Advanced options

Pay again

The Pay again button allows users to repeat an outgoing transfer without creating a template.

To repeat a payment

  1. Navigate to Payments & transfers.

  2. Navigate to History to see the list of transactions.

  3. Click an outgoing transaction to see its statement.

  4. Click Pay again to initiate a payment with the same details.

  5. The payment details will be prefilled. Change the sum and add a description if needed.

  6. Confirm the payment.

Pay back

The Pay back button allows users to create a “response” payment to an incoming transfer. The feature can be configured by a Feature change request. Follow the steps below to send a payment using the incoming transfer details:

  1. Navigate to Payments & transfers.

  2. Navigate to History to see the list of transactions.

  3. Click an incoming transaction to see its statement.

  4. Click Pay back to initiate a payment with the Sender details.

  5. The payment details will be prefilled. Change the sum and add a description if needed.

  6. Confirm the payment.

Batch payments

Creation of a new batch payment

To create a batch payment, follow the steps below:

  1. In the Web Interface, navigate to the Payments & transfers > Batch section.

  2. Click the Add new tab.

  3. On the Upload Batch screen, select an account from the list of available accounts and a payment method that is supported by the selected account.

  4. Click Download .csv template to download the CSV file on your machine. The template contains all the necessary fields that you need to fill in to perform the payment. For more information on the template, see the CSV template details subsection.

  5. On your machine, fill in the payment information for every individual transaction in the corresponding fields of the template and save the changes. Rename the CSV file if necessary.

  6. Once you’ve filled in all the payment information, navigate back to the Upload Batch screen and either click Select .csv file to upload or simply drag and drop the file in the upload box. The file will appear as a separate item under the upload box.

  7. Click the Upload button to complete the uploading of a template. A dialog confirming that files have been uploaded successfully will appear.

As a result, the batch payment will appear in the table on the All tab. All newly created batch payments have the Waiting for approval status.

For more information on statuses, see the Checking the status of a batch payment subsection.

Approving a batch payment

To approve a batch payment, follow these steps:

  1. In the Web Interface, navigate to the Payments & transfers > Batch section.

  2. In the table on the All tab, click the Details button of the batch payment that you want to approve.

  3. On the appeared screen with all the separate payments included in the batch payment perform one of the following actions:

  • To approve a batch payment, click Approve: The batch payment will have the Processing status.

  • To decline a batch payment, click Decline: The batch payment will have the Rejected status.

When the approved batch payment is completed, it will change its status from Processing to Completed. Once it’s completed, you can see all payments included in the batch as separate transactions in the Dashboard.

Please note that a batch will have the Completed status even though some of its transactions were declined while processing. For instance, after approving a batch, if 99 transactions out of 100 are successfully processed, while 1 transaction is declined, the status of the batch payment will be Completed. The same rule applies to situations with insufficient funds in the account: Transactions will be carried out until the funds run out, and the remaining transactions will not be processed, while the batch payment will have the Completed status. For more information on statuses, see the Checking the status of a batch payment subsection.

Currency exchange

The Web Interface allows to exchange currencies between your accounts by means of several clicks. Follow the steps below to exchange currencies in the Web Interface (existing accounts in both currencies of the exchange pair are required):

  1. Navigate to Currency exchange in the top sidebar.

  2. Select an account to exchange currency from using the drop-down list.

  3. Set the exchanged amount in the You send field.

  4. If your account is multi-currency, no additional actions are required. When exchanging funds from a single (mono) currency account, another account in the target currency is required.

  5. Select the target currency from the drop-down list next to the You get field.

  6. The target amount will be offered according to the <White Label> exchange rate. The calculated Fee will be charged as a separate transaction.

  7. Click Exchange to confirm the transaction and verify the process with 2FA.

  8. The target amount will be transferred to your account in the corresponding currency.

The exchange rate is rounded to two numbers after the decimal separator. The execution rate is not be affected.

Cards

The Web Interface allows to issue new cards and manage their functionality. Navigate to the Cards tab in the top sidebar to execute the following actions:

Issue a new card

  1. Click Order new card.

  2. Select whether a new card is to be Plastic or Virtual.

  3. Open a new account or select an account from the drop-down list to link the card to.

  4. Fill in your personal details and set the internal card name.

  5. Fill in the shipping details (for plastic cards only).

  6. Verify the order information and click Continue.

  7. Virtual cards will be available in the web interface in a minute.

  8. Plastic cards are delivered up <two week’s time>.

The number of Cards per profile can be limited. Contact <White Label> for additional details.

Manage an existing card

Select a card to configure from the All cards list. The following options are available:

  • Freeze card – the option disables all transactions and withdrawals for the card. Click the tumbler to freeze the card and click once again to unblock it. A blocked card will remain available in the list of cards.

  • View card details (only for virtual cards) – the option provides the full card number and its security code. Use the option to get the card details for online payments.

  • Top-up – transfer funds between own accounts to top up the card account. The functionality supports multicurrency accounts.

  • Convert to plastic (only for virtual cards) – the option issues a plastic card with the same details. Once the plastic card is received, the virtual one will be closed.

  • Security – the option allows you to switch on/off all internet transactions for the card.

  • Limit – set a daily limit for all the card transactions. Click the tumbler and then Change limit to configure the restrictions.

Settings

Navigate to Settings in the top sidebar to manage your personal details.
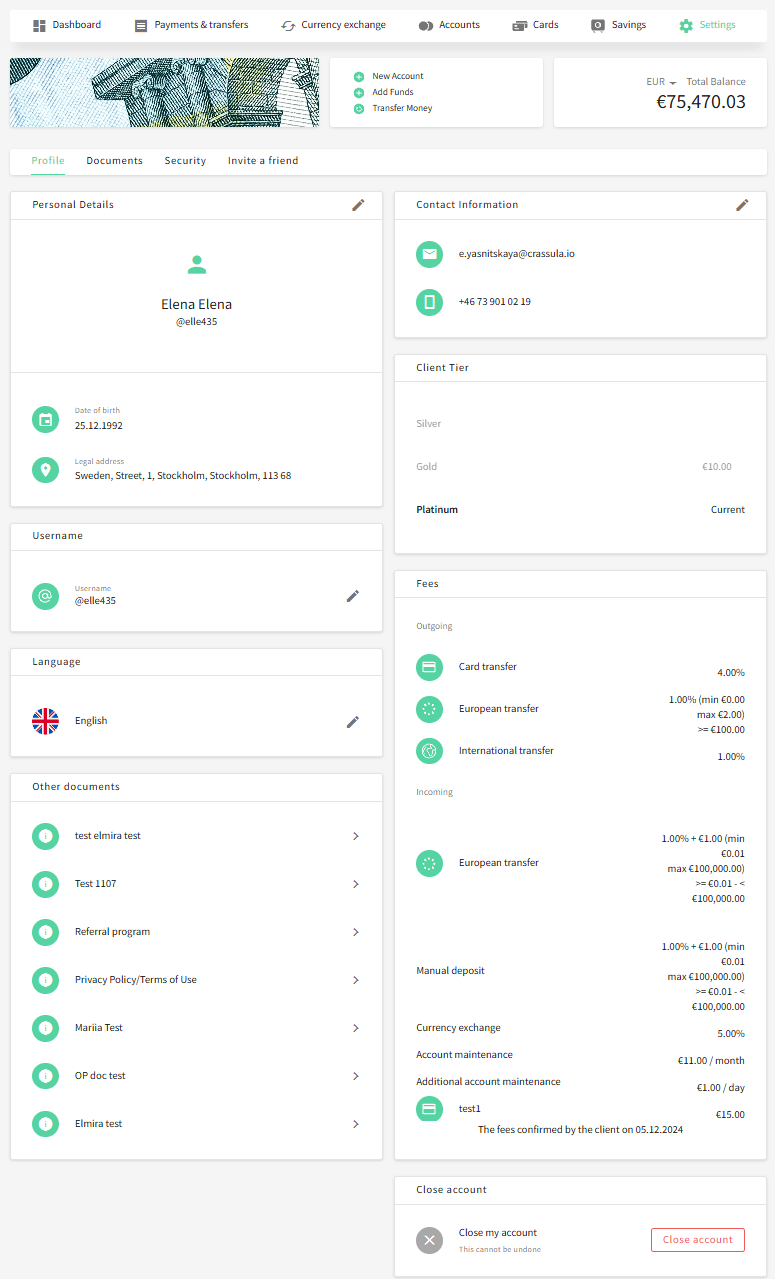
Profile

The Profile tab provides general information on your profile.

  • Personal details: the field defines general personal details. It is possible to edit the details, though all the new information is to be verified by additional documents.

  • Username: the username can be used instead of account details to transfer funds inside the <White Label>.

  • Language: the field defines the interface localization languages available in the <White Label>.

  • Contact information: the field defines main contact details. It is possible to edit the details, though all the new information is to be verified by additional documents.

  • Client tier: the field shows current tier level. When provided by the <White Label>, you can upgrade/downgrade your tier level for an extra charge to change your profile limits and rates.

  • Cashback: the field shows all active cashback reward programs that are applied to your outgoing transfers.

  • Fees: the field shows all active fees that are applied to your transfers and other transactions.

To upgrade your tier level

  1. Navigate to the Client Tier field of the profile settings.

  2. Click Upgrade in the corresponding tier line.

  3. The payment widget will be opened.

  4. Set an account for payment processing.

  5. Set a currency for multi-currency accounts.

  6. Click Get <Tier_name> to confirm the upgrade.
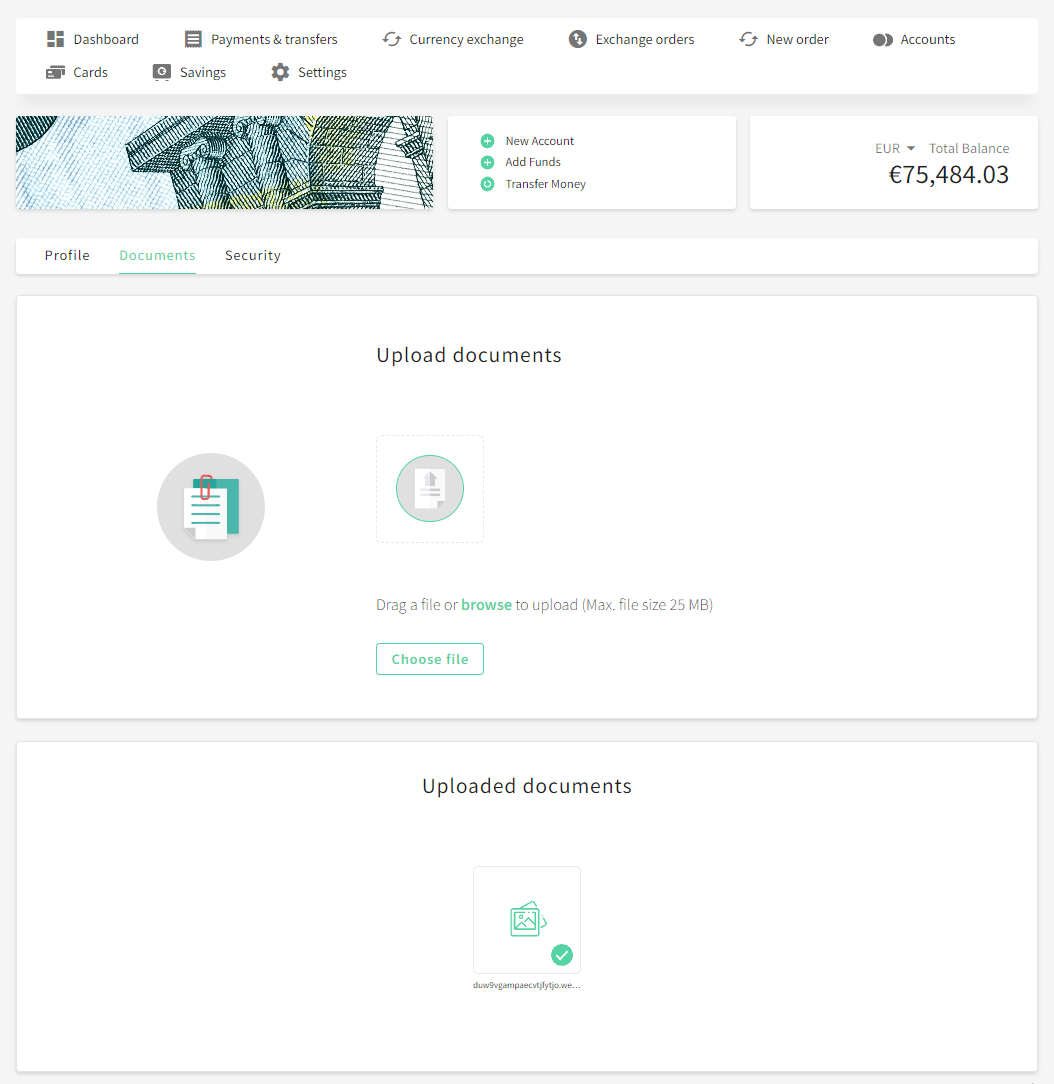
Documents

The Documents tab provides a convenient way to upload a new document if one is requested by the compliance and support teams. Click Choose a file to upload a document.
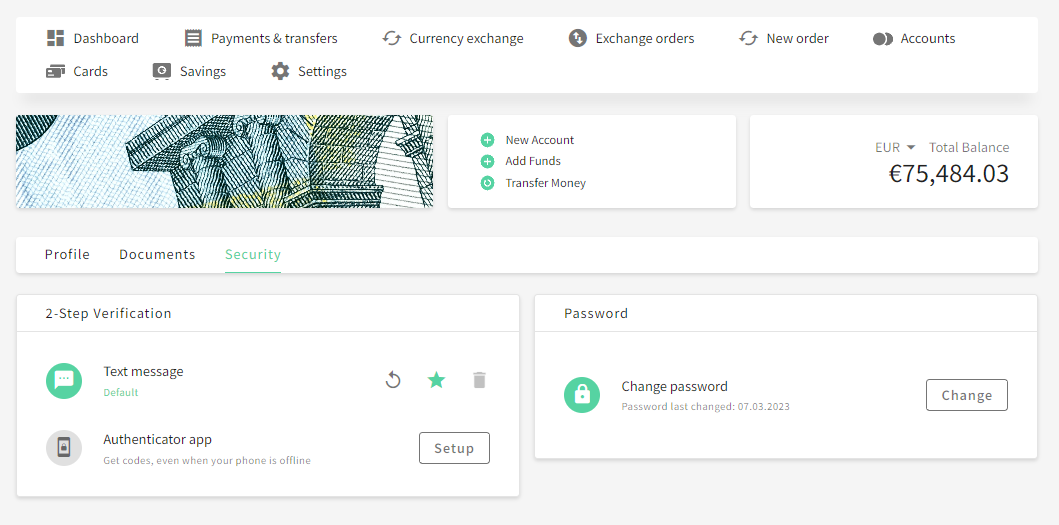
Security

Currently, the Security section is available only for Persons.

The Security section provides a convenient way to set additional means of your profile protection:

  • 2-step Verification is an additional functionality of profile protection (only active clients can change their 2FA details):

    • Text message - confirm app activity using codes sent as text messages to your mobile phone.

    • Authenticator app - confirm app activity using either Google Authenticator or Authy.

  • Change password - change your profile password. A currently active password is required.
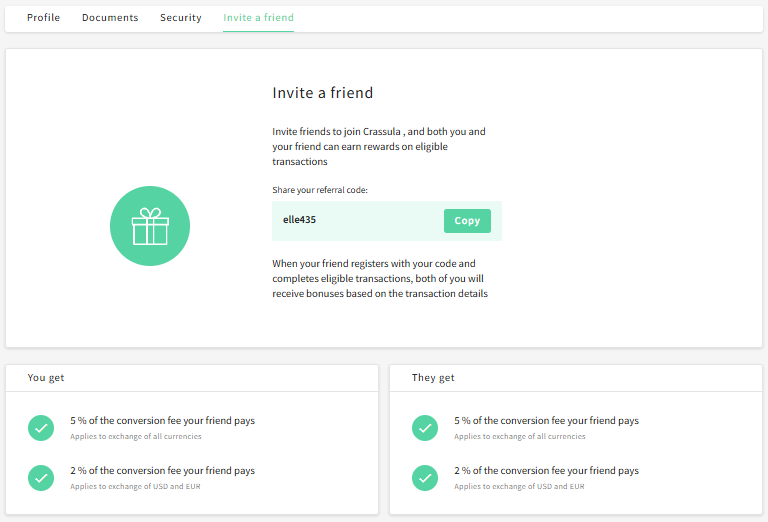
JavaScript errors detected

Please note, these errors can depend on your browser setup.

If this problem persists, please contact our support.