Skip table of contents

Access roles

Overview

An access role defines the authorized activities of persons, companies, and company staff; the functionality allows to assign a client to a list of actions permitted in the Web Interface. By default, if there are no Standard access roles assigned to a client, all actions will be available.

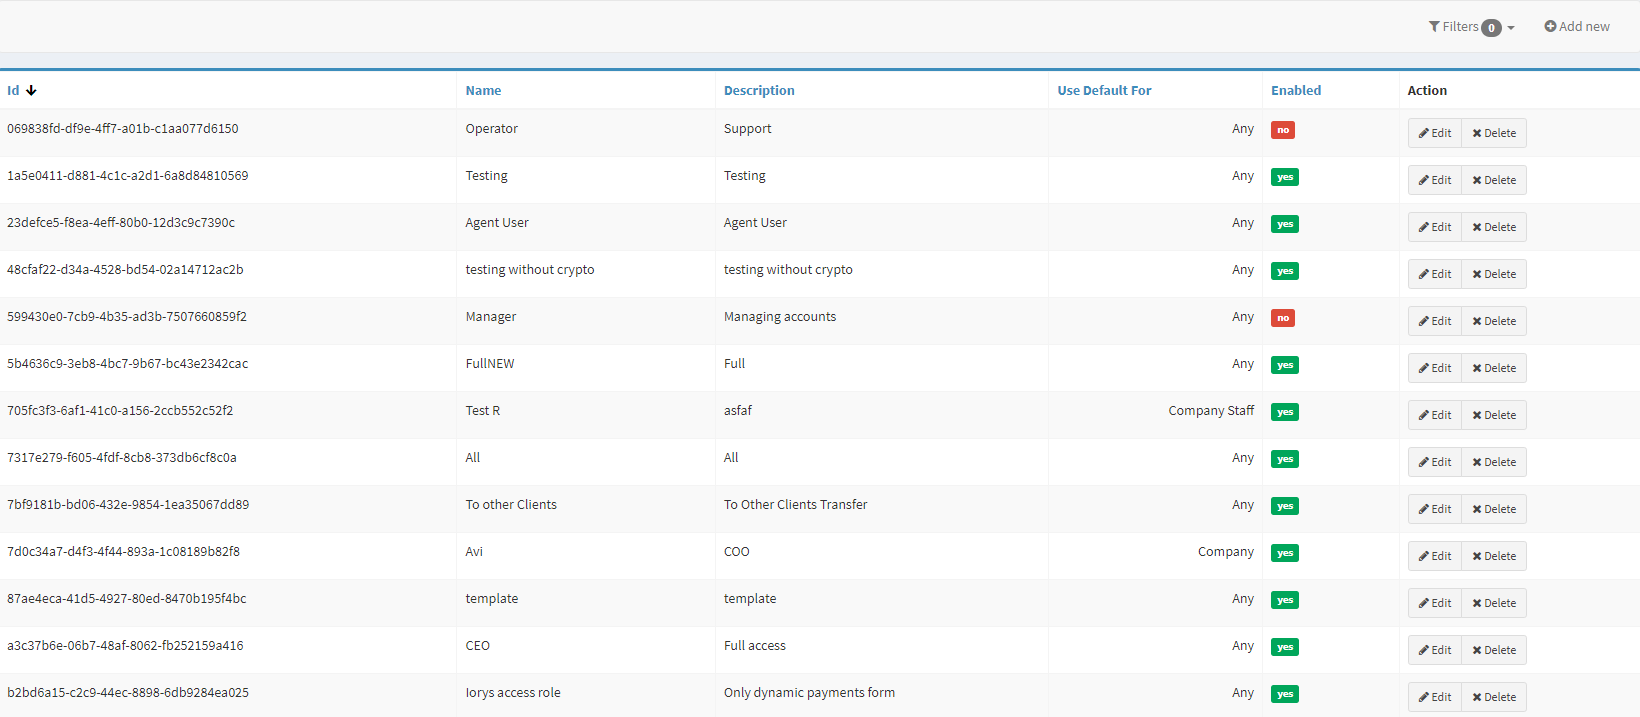
The Access roles tab provides the list of all access roles registered on the platform.

Opening the item

Follow the steps below to see access role details :

  1. Navigate to the Admin Panel.

  2. Click Banking on the left sidebar.

  3. Go to the Access roles menu item to open the Access role list.

  4. Click Edit in an access role line to open its details.

How to create an Access role

Access roles have to be assigned to Persons, Companies, and Company staff. For example, a company employee can be assigned to a list of actions permitted in the Company’s web interface.

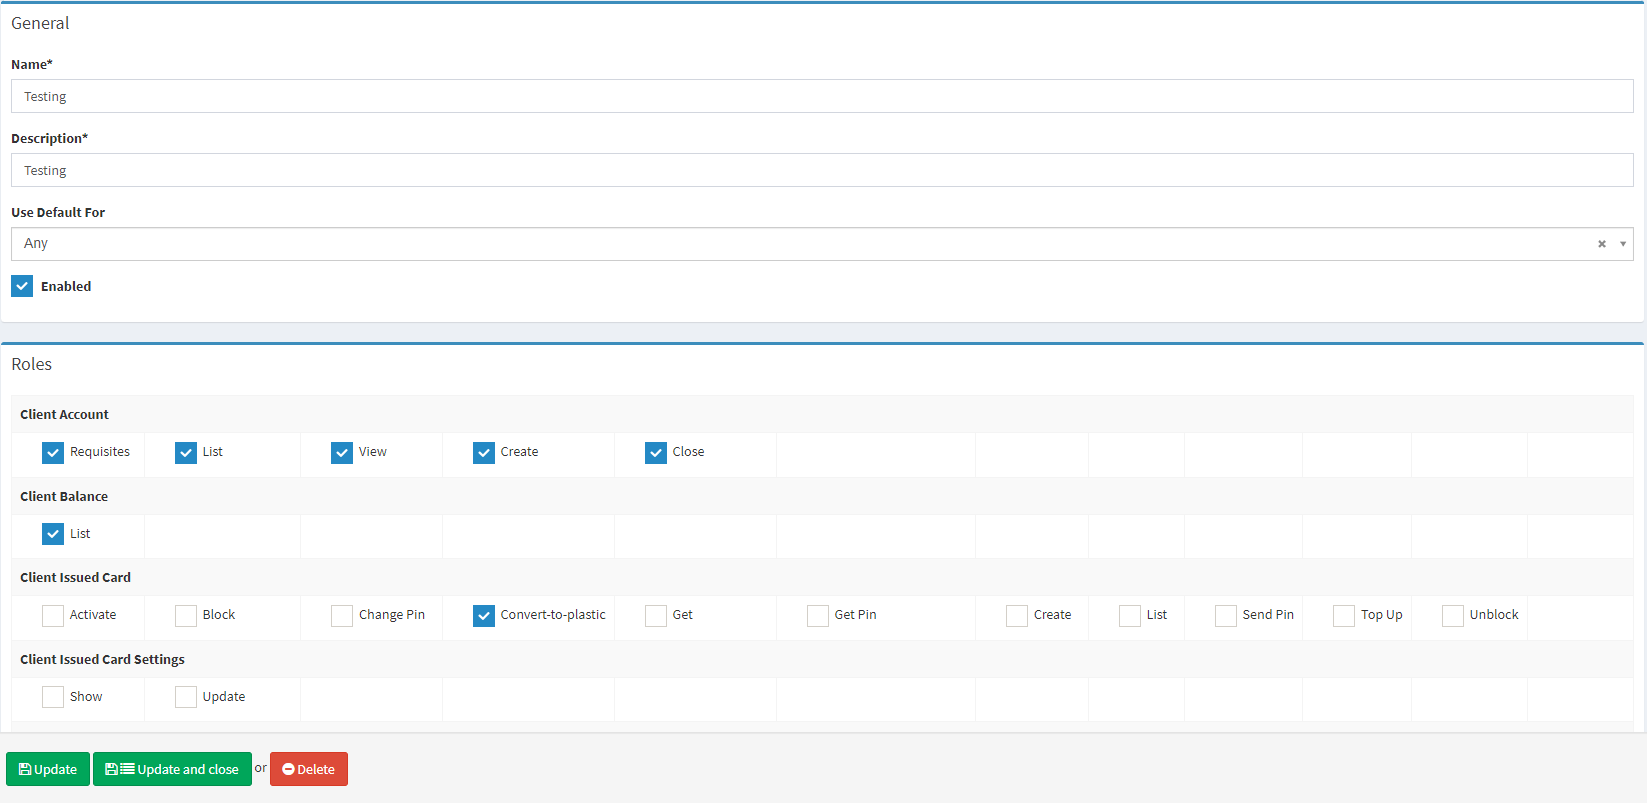
To create an Access role

  1. Click Add New in the top-right corner of the Access roles tab.

  2. Type in the name and description you want to set for the access role.

  3. Select a user type the role will be applied to in the Use Default For drop-down menu.
    If the None option is selected, the role will not be applied automatically—manual assignment will be required.

  4. Disable the Enabled checkbox if you want to activate the access role later.

  5. Select the actions allowed for the access role in the Roles list (see the following sections for details on the actions)

  6. Click Create to confirm the changes.

Now the Access role is created and ready to be assigned to a Client.

How to assign an Access role

To assign an Access role to a Client

  1. An existing Access role is required, see the previous section for details.

  2. Navigate to the Persons/Companies/Company staff tab (depending on the type of the Client you need the Access Role to be assigned to).

  3. Click Edit to be navigated to the corresponding Client’s profile.

  4. Navigate to the Security section of the profile for Persons and Companies. The step is omitted for Company staff profiles.

  5. Click Access roles, a list of created Access roles will be demonstrated in the drop-down menu.

  6. Select an Access role you need to assign to the Client.

  7. Click Update to apply the changes.

Person's profile

Component parameters

Access roles list

Parameter

Description

Id

The column demonstrates unique role identification numbers in the Crassula system.

Name

The column includes access roles names.

Description

Additional role description defined while creation.

Use Default For

Defines the user type the role is applied to automatically:

Enabled

Defines whether the role status is Enabled or Disabled.

Action

Browse, edit, or delete role details.

  • Click Edit to open a role with the right to edit the details.

  • Click Delete to remove a role.

Filters

Search for access roles by names and status; multiple-choice is available.

Add new

Create an access role manually, see the following sections for details.

Help

Click to access the current page right from the Admin Panel.

Configuring the component

Access role details is the main panel of role information display and editing.

Edit an access role

Parameter

Description

Name

The name set during the role creation process.

Description

Additional role description set during the creation process.

Use Default For

Defines the user type the role is applied to automatically:

Enabled

Defines whether the role status is Enabled or Disabled.

Roles

Defines the actions allowed for the access role in the list:

  • Client Account provides access to the following actions:

    • List – browse the account list. When disabled, the client will not be able to see and create accounts.

    • Requisites - browse account requisites and top up the account with a manual bank transfer.

    • View – browse account details.

    • Create – open a new account.

    • Close – delete an account (see Accounts for details).

  • Client Transfer provides access to the following actions:

    • Cancel – delete a drafted transfer

    • Dynamic – dynamic transfers execution with variable parameters

    • List – browse the executed transfers list. When disabled, the client will not be able to see the list of transfers and create new payments.

    • View – browse the transfer details

    • Statement – upload an account statement

    • Payslip – send a transfer via the Payslip provider

    • Sepa – send a transfer via the Sepa provider

    • Send – send a drafted transfer

    • Internal – send a transfer to another client

    • Swift – send a transfer using SWIFT

    • Self – transfer money between the Client’s accounts

    • Card – transfer money between the Client’s cards

    • Local – send local UK transfers in pounds

    • Crypto – transfer cryptocurrency

  • Client Balance provides access to the following actions:

    • List – browse the Client balance(s)

  • Client Issued Card provides access to the following actions:

    • Activate – change the status of a new card to active

    • Block – disable all transactions for a card

    • Change Pin – set or update a card pin-code

    • Get – browse issued cards details

    • Get Pin - browse issued cards pin codes

    • Create – issue a new card

    • List – browse all the issued cards. Make sure to disable the Client Issued Card Settings>Show action to disable the Cards section in the Web Interface.

    • Top Up – top up the card from an account / a card

    • Unblock – enable all transactions for a blocked card

  • Client Issued Card Settings provides access to the following actions:

    • Show – browse the cards settings. Make sure to disable the Client Issued Card>List action to disable the Cards section in the Web Interface.

    • Update – edit the cards settings

  • Client Client Card provides access to the cards used for account top-up:

    • List – browse the cards that have been used for account top-up

    • View – browse the card details that have been used for account top-up

    • Update – edit a saved top-up card

    • Close – disable a top-up card

    • Create – save a card for further top-ups

    • Delete – discard a saved top-up card

  • Client Profile provides access to the following actions:

    • View – browse profile details with no right to edit

    • Update – edit profile details

  • Client Token provides access to the following actions:

    • Create – issue a personal key token

  • Client Company provides access to the following actions:

    • List – browse the associated companies list

    • View – browse the associated companies details (see Companies for details)

    • Create – create an associated company (see Companies for details)

  • Client Company Staff provides access to the following actions:

    • List – browse the list of Company personnel (see Company staff for details)

  • Client Exchange provides access to the following actions:

    • Currency – browse the currency of the executed exchange transactions

    • View – browse the exchange transactions details

    • List – browse the list of executed exchange transactions

    • Update – change transaction details

  • Client Document provides access to the following actions:

    • List – browse all the documents uploaded

    • Create – create a new Client document

    • Update – edit a document

    • Upload – upload a new document

    • View – browse the details of an uploaded document (see the Identification section of Getting Started – Banking Admin Panel for additional information)

  • Client Drafts provides access to the following actions:

    • Confirm – confirm a draft creation

    • Delete – remove a transaction draft

    • Create – add a transaction draft

  • Client Existing Recipient provides access to the following actions:

    • List – browse the transfer history and the recipients

  • Client Fee provides access to the following actions:

    • Fees – browse the fees applied to the Client

    • Transfer – browse transfer fees

    • Currency – browse exchange transactions fees

  • Client Issued Card Holds provides access to the following actions:

    • List – browse all the card holds

  • Client Issued Card Limit provides access to the following actions:

    • List – browse the limits applied

    • Create – add a limit for card transactions

    • Delete - discard a limit

  • Client Limit provides access to the following actions:

    • List – browse the limits applied to the Client (see Limits for details)

  • Client Payout (eCom) provides access to the following actions:

    • Create – create a Payout payment to a client for POS transactions executed in a period

    • Parameters list – browse the payout details and settings

  • Person Email provides access to the following actions:

    • List – browse all the Client emails

    • Add – add a new email to the Client’s profile

    • Update – change an email details

    • Delete – discard an email

    • Mark as primary – set an email as a primary contact

    • Send verification code – verify email and other transactions

  • Person Phone provides access to the following actions:

    • List – browse all the Client emails

    • Add – add a new email to the Client’s profile

    • Update – change an email details

    • Delete – discard an email

    • Mark as primary – set an email as a primary contact

    • Send verification code – verify email and other transactions

    • Verify – verify a phone number using verification codes

  • Client Push Notification Subscription provides access to the following actions:

    • Create – Add a subscription to transaction notifications

    • Delete – discard a subscription

    • List – browse active subscriptions

  • Reports provides access to the following actions:

    • Companies – create and manage company transactions reports

    • Persons – create and manage person transactions reports

    • Transactions – create and manage transactions reports

  • Client Fee FX markup provides access to the following actions:

    • List – browse all FX markups set for the Client

    • View – browse markup details

    • Status update – change the status of a markup

    • Create – create a new markup

    • Update – change markup details

    • Delete – discard a markup

  • Client Price list provides access to the following actions:

    • List – access the list of price lists

    • View – browse price list details

    • Assign – assign a price list

    • Delete – discard a price list

  • Client Fee Transfer Fees provides access to the following actions:

    • List – access the list of charged fees

    • View – browse details of a charged fee

    • Create – create a transfer fee

    • Update – change a transfer fee

    • Delete – discard a transfer fee

  • Client Transfer Templates provides access to the following actions:

    • List – browse all transfer templates created by the Client

    • Create – create a template

    • Update – change a template

    • Delete – discard a template

    • View – browse templates details

  • Client Vault provides access to the following actions:

    • List – access the list of Vaults

    • View – browse Vault details

    • Create – open a new Vault account

    • TopUp – top up a Vault account

    • Withdrawal – withdraw funds from a Vault account

    • Vaults – access the list of Vaults in the Admin Panel

Help

Click to access the current page right from the Admin Panel.

Useful tips

Remember to assign an access role to decision-makers of a company (for example, a CEO or an accountant).

JavaScript errors detected

Please note, these errors can depend on your browser setup.

If this problem persists, please contact our support.