.png)
The Crassula Admin Panel is your central hub for managing all aspects of your financial product, including user profiles, banking services, compliance flows, and system reporting. Whether you're launching a simple e-wallet or a fully licensed digital bank, this guide introduces the key workflows and features available in the Admin Panel.
Before You Begin
Make sure you have administrator credentials for accessing the Crassula Admin Panel. Contact Crassula Support for help.
Navigating the Admin Panel
-
Sidebar Navigation: The Admin Panel is organized by function (Clients, Accounts, Payments, Compliance, Reports, etc.)
-
Filters: Easily segment records using advanced filters.
-
Access Roles: Control who sees what using customizable permission sets.
-
Audit Logs: Monitor changes and actions made by administrators in the Activity log.
Step 1: Access the Admin Panel
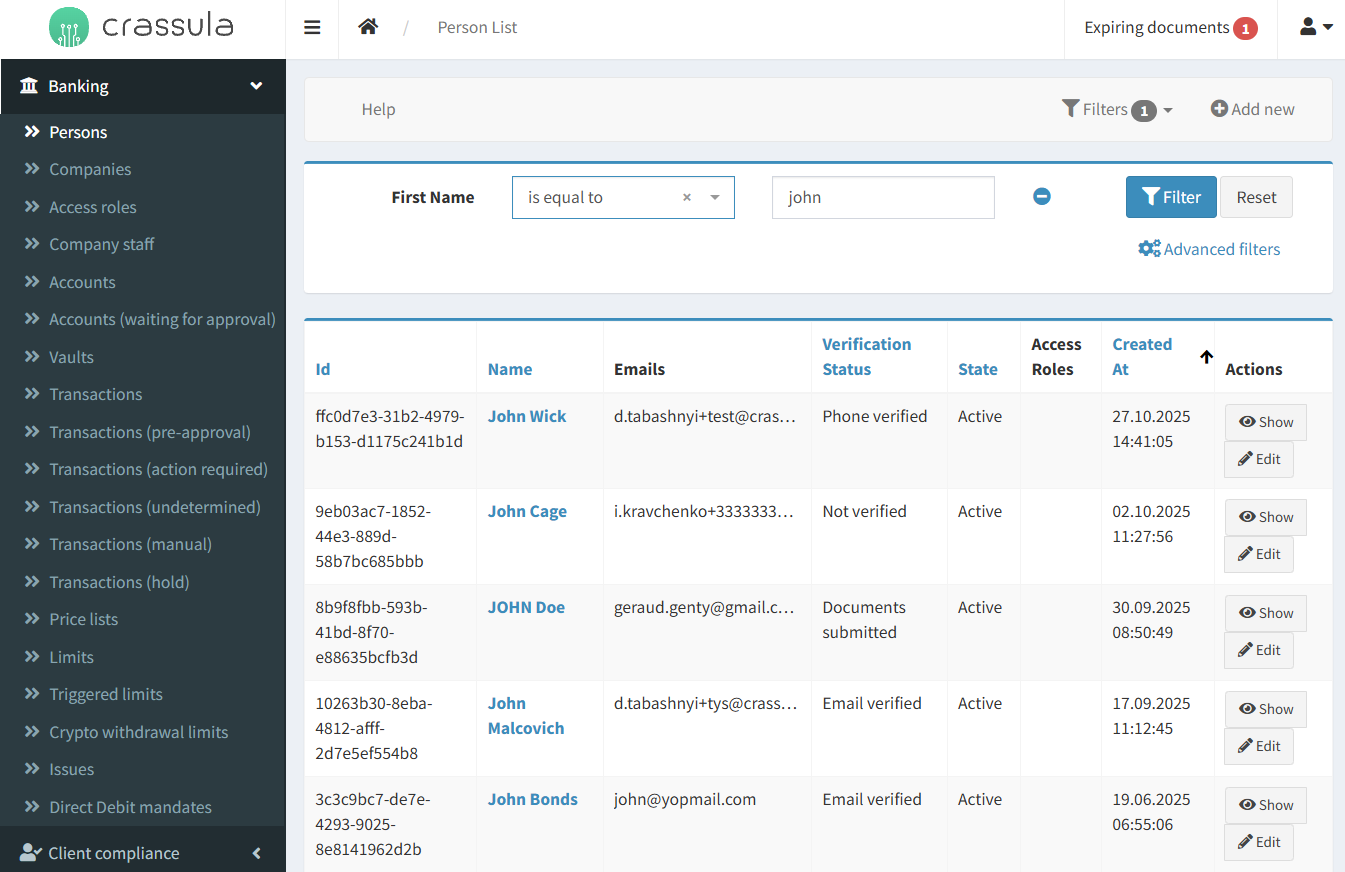
Crassula's Administrative Panel provides various ways to manage a client base, including private person and company registration, identification, account opening, and transaction overview.
Follow the steps to start the overview:
-
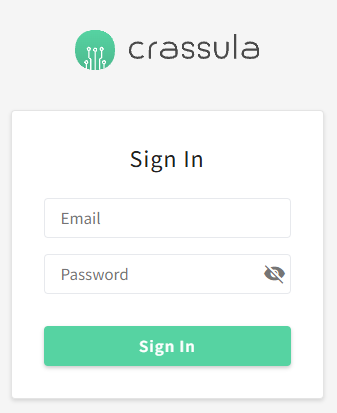
Navigate to your personal Admin Panel sign-in page.
-
Use your email and password to log in.
-
Enter the confirmation code from the app.
You’ll land on the Dashboard, which gives an overview of your brand's operational status.
Step 2: Configure Your Company Profile
Before you start working with clients, you need to create your brand’s company profile. It represents your business entity within the Crassula system and is required for processing fees, commissions, and other business operations on behalf of the company.
To create your brand’s company profile
-
Navigate to Banking > Companies.
-
Review and fill in basic company details:
-
Navigate to the Companies menu item.
-
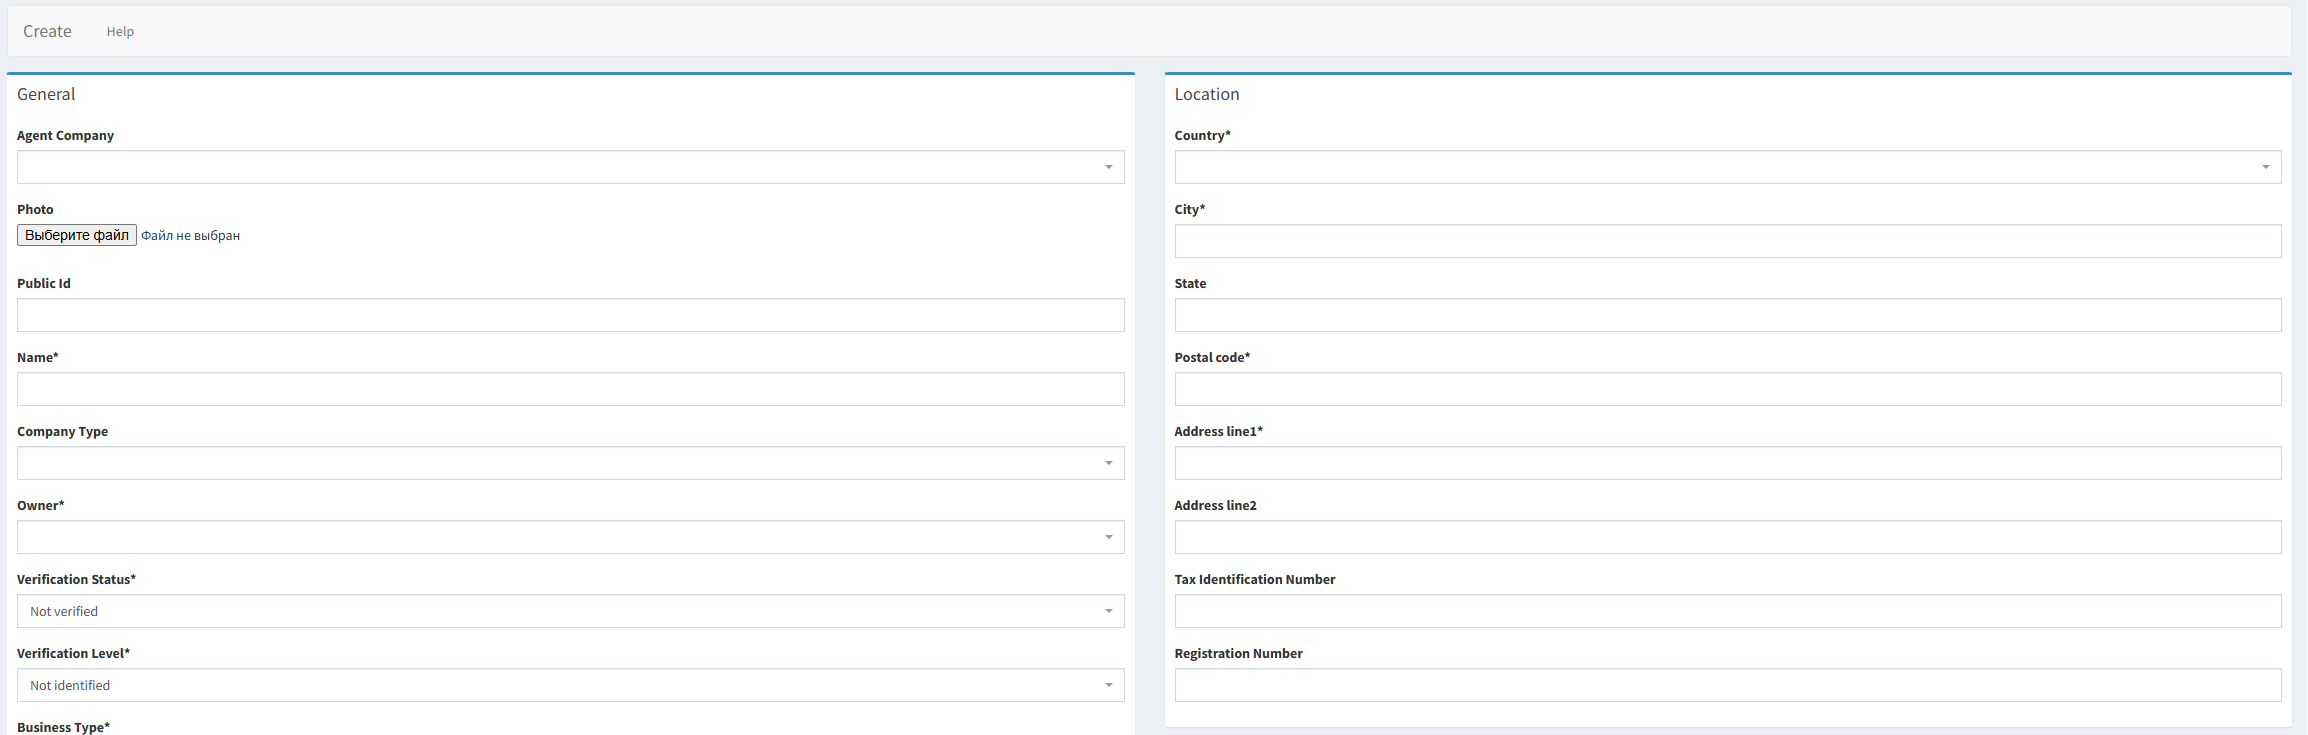
Click Add New in the top-right corner of the tab.
-
Fill in the General form, which also includes the following parameters:
-
Verification levels that depend on the identification steps completed and define the list of allowed operations (see Limits and Identification requests for details).
-
Company type defines the group of clients the profile belongs to. The groups are configured in Dictionaries and allow Brands to set limits and price lists for each group. See Dictionary for configuration details.
-
-
Complete the Contacts field. The information is optional.
-
Add legal address information to the Location field.
-
Set a price list for commissioning in the Settings field (see Price lists for details).
-
The defined limit is to be dependent on the verification level (see Limits for details).
-
Set access roles in the Security field. See Access roles for details.
-
Tags are optional.
-
Click Create to submit the changes. The Brand settings define how the platform behaves across interfaces. Keep them up to date.
-
Step 3: Set Up Legal and Compliance Documents
Before launching your product, you need to set up your legal and compliance documents. These documents define the contractual framework between your company and clients, ensuring transparency, regulatory compliance, and proper acknowledgment of service terms.
To set up legal documents
-
Go to Documents > Legal Documents.
-
Click Add new to create a document.
-
Select the document type and fill in the mandatory fields. See the following sections for details.
-
Specify the Country group field to make the document available only to clients in the specified location. See Country groups for additional details.
-
Click Create to apply the changes. The legal document will be applied according to the type of document selected.
Navigate to Legal Documents for detailed configuration procedures.
For changes that require client re-approval, use the Legal Document Announcements section.
Step 4: Review and Configure Limits
Before processing transactions, you should review and configure client limits. Limits define thresholds for transactions, balances, and account activity, ensuring compliance with regulations and preventing suspicious or excessive operations.
To configure limits
-
Go to Banking > Limits.
-
Click Add New in the top-right corner.
-
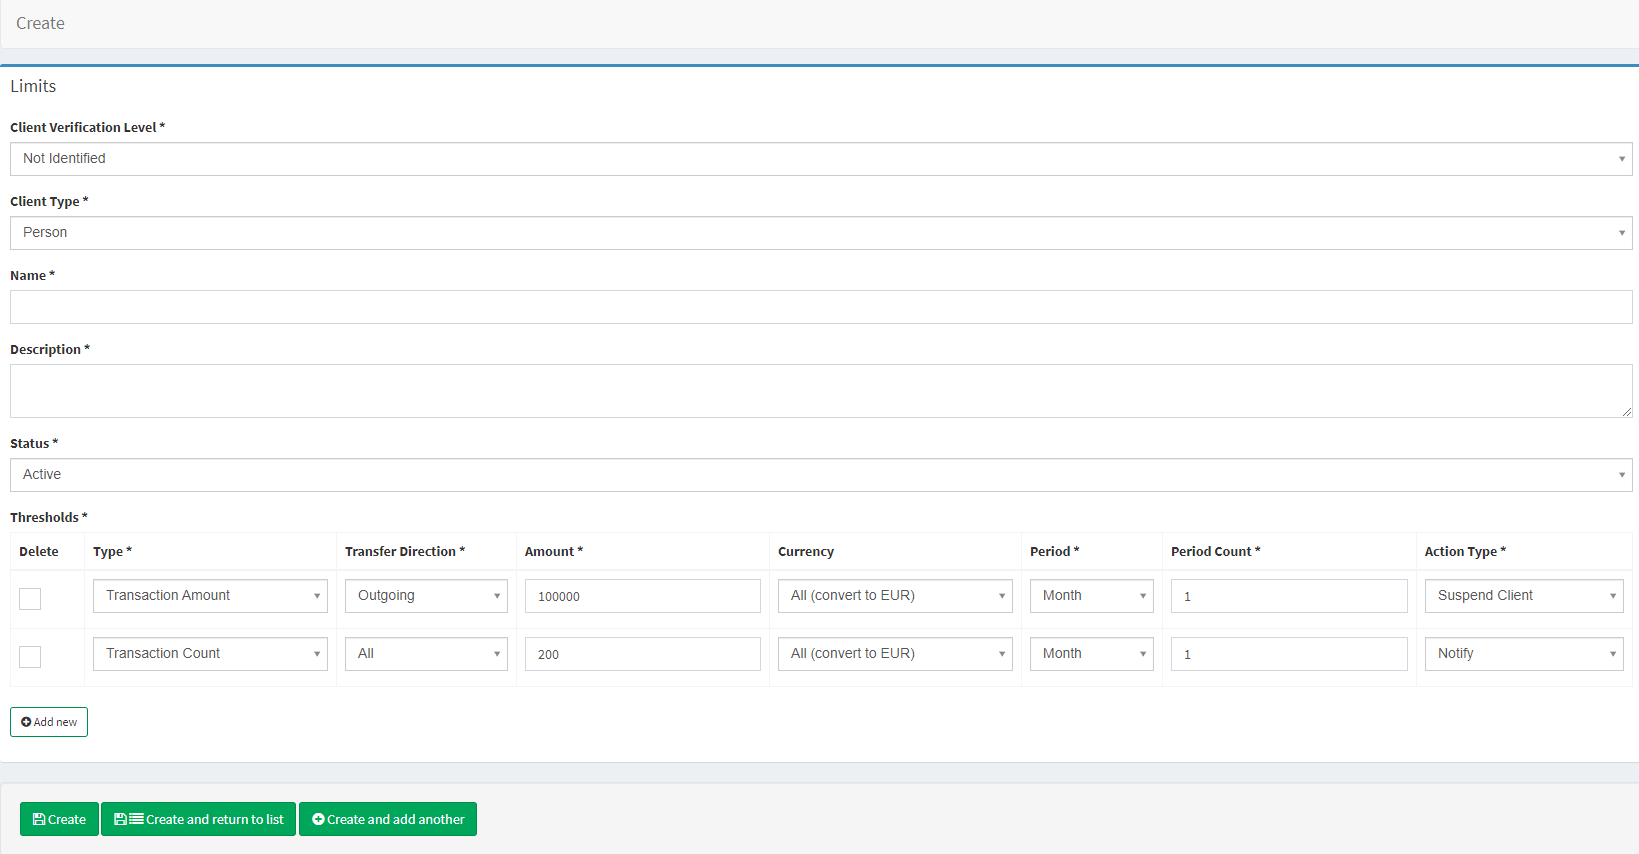
Select a Client Verification Level to set the limit for, see Identification requests for details. The parameter can also be used to define a Tier level for the limit.
-
Select a Client Type.
-
Select a Person type or Company type depending on the client type selected in the previous step. The field is optional and can be used to narrow down the list of clients the limit should be applied to. At least one dictionary must be configured. See Dictionary for details.
-
Type in the limit name in the Name field.
-
Add a description in the Description field.
-
The limit status is Active by default. Disable the limit if you do not need it active once it is created.
-
Click Add New to add a threshold for transactions or transfers.
-
Fill in the Thresholds details (See the Configuring the component section for parameters required for threshold configuration).
-
Click Create to confirm the limit initiation.
Navigate to Limits for detailed configuration procedures.
Step 5: Configure Fees and Price Lists
Setting up fees and price lists allows you to define how clients are charged for financial operations. Price lists ensure consistent and transparent fee application across different services, client types, and verification levels.
To create a price list
-
Navigate to Banking > Price Lists.
-
Create price lists for different client segments.
-
Add the following fees:
-
Transfer fees: One-off fees that depend on the transfer type. See Transfer fees for details.
-
FX markup: Apply a margin to currency exchange operations by adjusting the rate shown to end users. See FX markup fees for details.
-
Subscription fees: Transition fees, which are charged from the client at the moment of upgrade/downgrade. See Subscriptions for details.
-
Referral rewards (optional): Define bonus percentages for both referrers and referrals. See Referral Program (Price List) for details.
-
Navigate to Price lists for advanced configuration procedures.
Step 6: Add Test Clients (Optional for Internal Testing)
Before onboarding real customers, it’s recommended to create test clients in a staging environment. These profiles let you safely test how fees, limits, and verification levels interact and ensure your configurations work as intended.
To create a client
-
Open Banking > Persons.
-
Click Add New in the top-right corner of the tab.
-
Fill in the Personal form that includes the following:
-
Passport details, such as Name, Date of birth, and Nationality.
-
Public ID is an internal nickname used instead of detailed information such as names, account numbers, and contacts.
-
Person type defines the group of clients the profile belongs to. The groups are configured in Dictionaries and allow Brands to set limits and price lists for each group. See Dictionary for configuration details.
-
-
Complete the Contacts field. The information is obligatory.
-
Add legal address information to the Location field.
-
Set the default currency for total amounts and price list for commissioning in the Settings field (see Price lists for details).
-
The defined limit will be dependent on the verification level (see Limits for details). It is possible to select a Limit manually from the Limit drop-down list.
-
Set custom limits in the Custom threshold limits field if necessary. The defined threshold will be applied only to the current client and will be of a higher priority compared to the Limit pack thresholds.
-
Fill in the Security field, paying attention to Verification levels and Access Roles (see Limits, Access roles, and Identification requests for details).
-
Tags are optional.
-
Click Create to submit changes.
Navigate to Persons for detailed configuration procedures.

What’s Next
Once your system is configured, onboard your first clients, test the flow end-to-end (from onboarding to transaction), and reach out to your Crassula manager if you need to enable additional features (e.g., multi-tenancy, Okta SSO, etc.).
Resources to explore:
-
Logs: 2FA logs, authentication logs, and session tracking.
-
Access roles and Access roles (Administration): Manage admin and user permissions.
-
Quotas and Limits: Fine-tune messaging and verification flows by country.